

For family researchers and the people who help them. Learn how to build your family tree, preserve the evidence behind your research, and work with relatives in Leaves.
This guide uses the English interface labels. You can choose another language in Settings. The examples use fictional family records.
1. Understand Leaves
What it is for
Use Leaves to build a family history, bring in research from another genealogy program, connect relatives, attach scans and photographs, and record why you believe a particular fact. Relatives can browse or contribute according to their project role. A project is the boundary for records and access: searching or linking a person within one project does not make a relationship to a person in another project.
How the records fit together
| Concept | What it represents | Example |
|---|---|---|
| Project | A private collection with an owner and optional collaborators | Smith Family Tree |
| Person | An individual, with names, facts, and family links | Catherine Brown |
| Family | A household or partnership grouping partners and children | Robert Smith & Catherine Brown |
| Fact or event | A claim about a person or family, possibly with a date and place | Birth, Marriage, Occupation |
| Place | A reusable location, optionally with map coordinates | Chicago, Cook County, Illinois, United States |
| Source | The evidence item described bibliographically | A census return or death register |
| Citation | A link explaining how a source supports a record, name, or fact | Census, page 44, quoted entry, Medium confidence |
| Media | An uploaded file or an imported reference to one | A photograph, scanned page, PDF, or interview |
| Note | Research reasoning or other text that can be linked to several records | Why two birth dates conflict |
| Repository | Where a source is held | An archive, library, website, or private collection |
A scan is Media. Its register is a Source. A Citation connects that source to the precise fact it supports. Depicts connects a photograph to the people or place shown; Evidence for connects a scan to its source. These links serve different purposes. Uploading a census image does not by itself establish a person's birth date.
A person's Timeline draws their own facts alongside relevant family facts. The Family tree draws relationships. Tree checker looks for consistency problems. Neither a tree connection nor an automated finding proves a historical conclusion.
Roles at a glance
The project owner pays for that project's capacity and controls its lifetime. A collaborator's personal subscription does not replace the owner's allowance.
| Role | Intended use | What you can do |
|---|---|---|
| Owner | Maintain and control the project | Read, create and edit; delete entire records; merge; invite; transfer ownership; delete the project; export |
| Viewer — Look, but not change | Share finished research | Read visible records; export only when the owner allows it |
| Editor — Add and correct records | Help with research | Read, create and edit, including uploads; no deletion of entire records or ownership transfer |
| Admin — Add, correct, and invite others | Help manage a research group | Editor permissions, collaborator management and project updates; no project deletion or ownership transfer |
Some actions are available only to the project owner, including saved-note editing and certain evidence and sharing controls. If you cannot see an action, ask the owner to help. A plan restriction or an import in progress can also make a project read-only. See collaboration and privacy.
2. Get started
Prerequisites
Open Leaves at app.leaves.family in your web browser. You need a beta account, an internet connection, and access to the email address used for your account. Email is used for verification, invitations, password recovery, and export links. On smaller screens, use Toggle sidebar to reveal navigation.
Leaves runs in your browser; you do not need to install a desktop application.
Get access during the beta
Leaves is currently in beta, and public sign-up is not available. If you do not yet have an account, visit the Leaves website and choose Join the beta to register your interest.
If you already have a beta account, open Sign in and use your account email and password.
Email verification: some sharing actions require a verified address. Use the resend control if the message has not arrived, observe the displayed cooldown, and check spam. Open the full link in the intended account. An expired or incomplete link needs a new message.
Sign in
- Enter Email and Password on Sign in.
- Use Show password if you need to check typing in a private setting.
- Optionally select Keep me signed in (30 days) on a device you control.
- Submit and open your project from Dashboard or Switch project.
Repeated failed attempts cause a temporary pause; you can make five attempts followed by five minutes. Use the message's countdown instead of repeatedly submitting. A suspended account needs the Leaves's help, not another password reset.
Recover a password
- Choose Forgot password? from Sign in.
- Enter your account email and request the reset email.
- Open its link, enter and confirm a new password, and submit.
- Sign in again with the new password.
The response avoids revealing whether an address has an account. Check spelling and spam even if it says the request was accepted. Reset links last 60 minutes; the reset request limit is three per 15 minutes. Use Request a new link when offered for an invalid or expired link. A completed reset revokes existing sessions, so you may need to sign in on every device.
Accept a project invitation
- Open the invitation email's link.
- Sign in with your beta account using the email address to which the invitation was sent. If you do not have a beta account yet, register your interest before continuing.
- Check the project and role, then choose Accept invitation.
- Choose Open the project when You’re in appears.
This link is for another account means the browser is signed in as someone else. Use Sign out and open the link and sign in to the invited account. This invitation is no longer valid can mean expired or already used: ask the owner for a new invitation. Do not forward invitation links as a way to give another person access.
First configuration
- Open the account menu at the bottom of the sidebar and choose Settings.
- Select a theme, density, language, name order, and date display. Choices save themselves.
- Open your project's Overview, then Project settings. Give it a descriptive Name.
- After creating a person, select a Focus person so the tree opens at a useful starting point.
- Decide who should have access and whether collaborators should be allowed to export before inviting anyone.
See account preferences and project management.
3. Find your way around
Sidebar and page layout
Dashboard shows your projects and routes back into recent research. Switch project changes the active collection; All projects returns to the broader project choice. Within a project, the sidebar contains:
- Overview, Family tree, and Tree checker.
- Records: Persons, Families, Places.
- Evidence: Sources, Media, Notes, Repositories.
The account menu contains Profile, Settings, Billing, and Sign out. The breadcrumb across the top tells you which project and record you are viewing. Toggle sidebar changes the navigation display.
A section can reopen its last record. Use All persons, All families, All places, or the equivalent return link to get back to its index. A detail page generally has the main record on the left and evidence, access, record information, or gaps on the right. Smaller screens stack these areas.
Search
- Choose the top Search control or press ⌘K on macOS / Ctrl+K on other platforms.
- Type at least two characters.
- Review results in the active project's record groups, select the intended result, and press Enter or click it.
The global result navigation supports persons, families, places, sources, and repositories. Search Media and Notes through their own indexes; do not assume every record type appears in the global palette.
Within an index, use its search field to narrow that section. Source search includes title, author, publication, and transcription. Search works together with filters; a correct name can appear absent because a filter remains active.
Filters, sorting, views, and selection
- Open Filter or use the Refine panel where offered.
- Choose a filter value; look for the active filter chip.
- Remove individual chips, use Drop filter, or choose Clear everything to broaden the results again.
- Use Sort by, its current sort label, or a sortable column header where available.
- Switch between the views offered by that section.
- Use Previous page and Next page for paginated results.
Persons have List, Table, and Cards; Families and Sources offer list/table layouts; Media offers cards/list; Notes offers Reading and Table; Places includes a map view. Repositories uses a table. Not every section has the same filters or controls.
A page-level checkbox selects visible rows, not every matching record across all pages. Bulk actions are concrete in Media; seeing selection elsewhere does not imply a universal bulk-edit feature. See shortcuts.
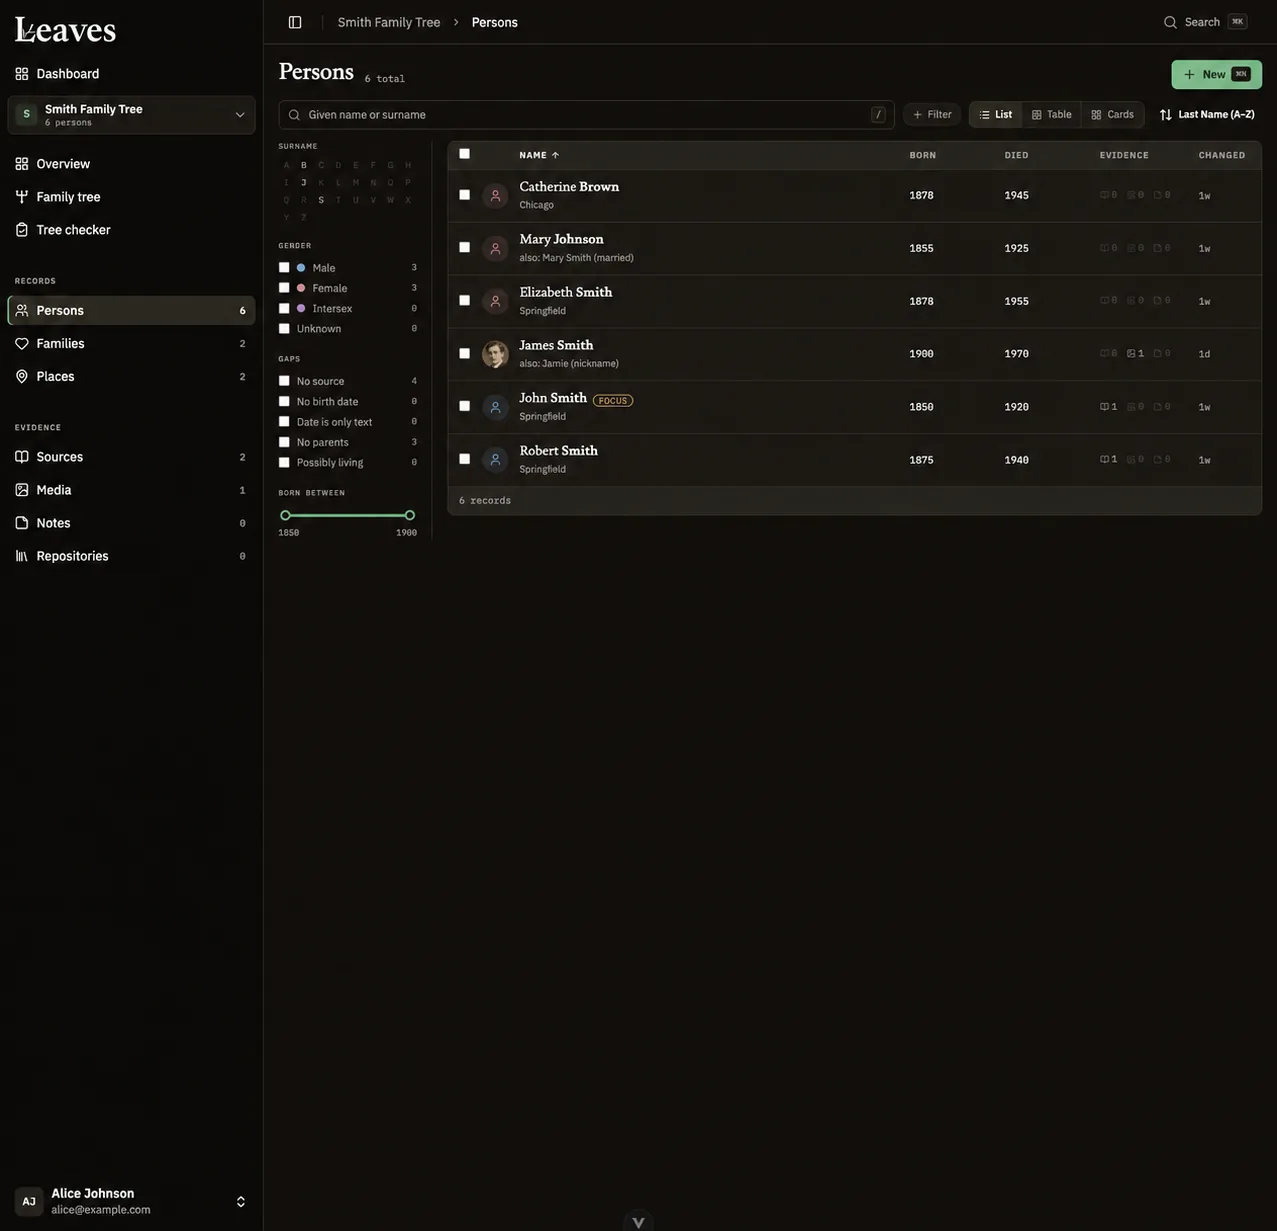
- 1Switch project before searching.
- 2Search, Filter, view choices, and sorting work together.
- 3Use gap filters to plan research.
Figure 1 — Persons index. Read the project selector before acting; use the search and refinement controls to narrow the collection; choose a row to inspect a person. The illustrated edition adds numbered callouts to the original screenshot. The example portrait was generated with AI.
Saving and cancelling
Sheets often open from New, Add, or a pencil icon. Required fields are marked. Cancel closes a draft; Save or the specific save label commits it. Date Apply updates the parent form's draft; it does not replace Save fact. Some inline fields save with Enter, and notes/preferences save automatically. Read the status rather than assuming every page has the same saving method.
If closing a dirty form produces an unsaved-changes prompt, keep editing to preserve the draft or deliberately discard it. An error banner is not a successful save. See conflicts and connection errors.
4. Create and manage projects
Dashboard and project overview
Dashboard brings together project cards, Continue where you left off, Worth a look, and collaborator activity where data exists. Counts refer to records, not research completeness. Worth a look can point to duplicates, unlinked files, or people without sources.
Overview provides:
| Panel/control | How to use it |
|---|---|
| People by decade of birth | Select a decade to inspect people in that period. Undated births do not establish a decade. |
| Where the family lived | Explore located places; records without coordinates cannot be plotted. |
| How well documented | Check People with a source, Events with a date, Places geocoded, and Sources with a repository. Open the offered gap links. |
| People | Compare In this project and Possibly living. The latter is a privacy heuristic, not proof of survival. |
| Who has access | Inspect collaborators and pending invitations; manage them when controls are available. |
| Change history | Review recorded changes. |
| Open the tree | Open the relationship view. |
| Export GEDCOM | Queue a genealogy export; see export. |
| View import summary | Review the import report for imported projects. |
| Project settings | Change project-level settings. |
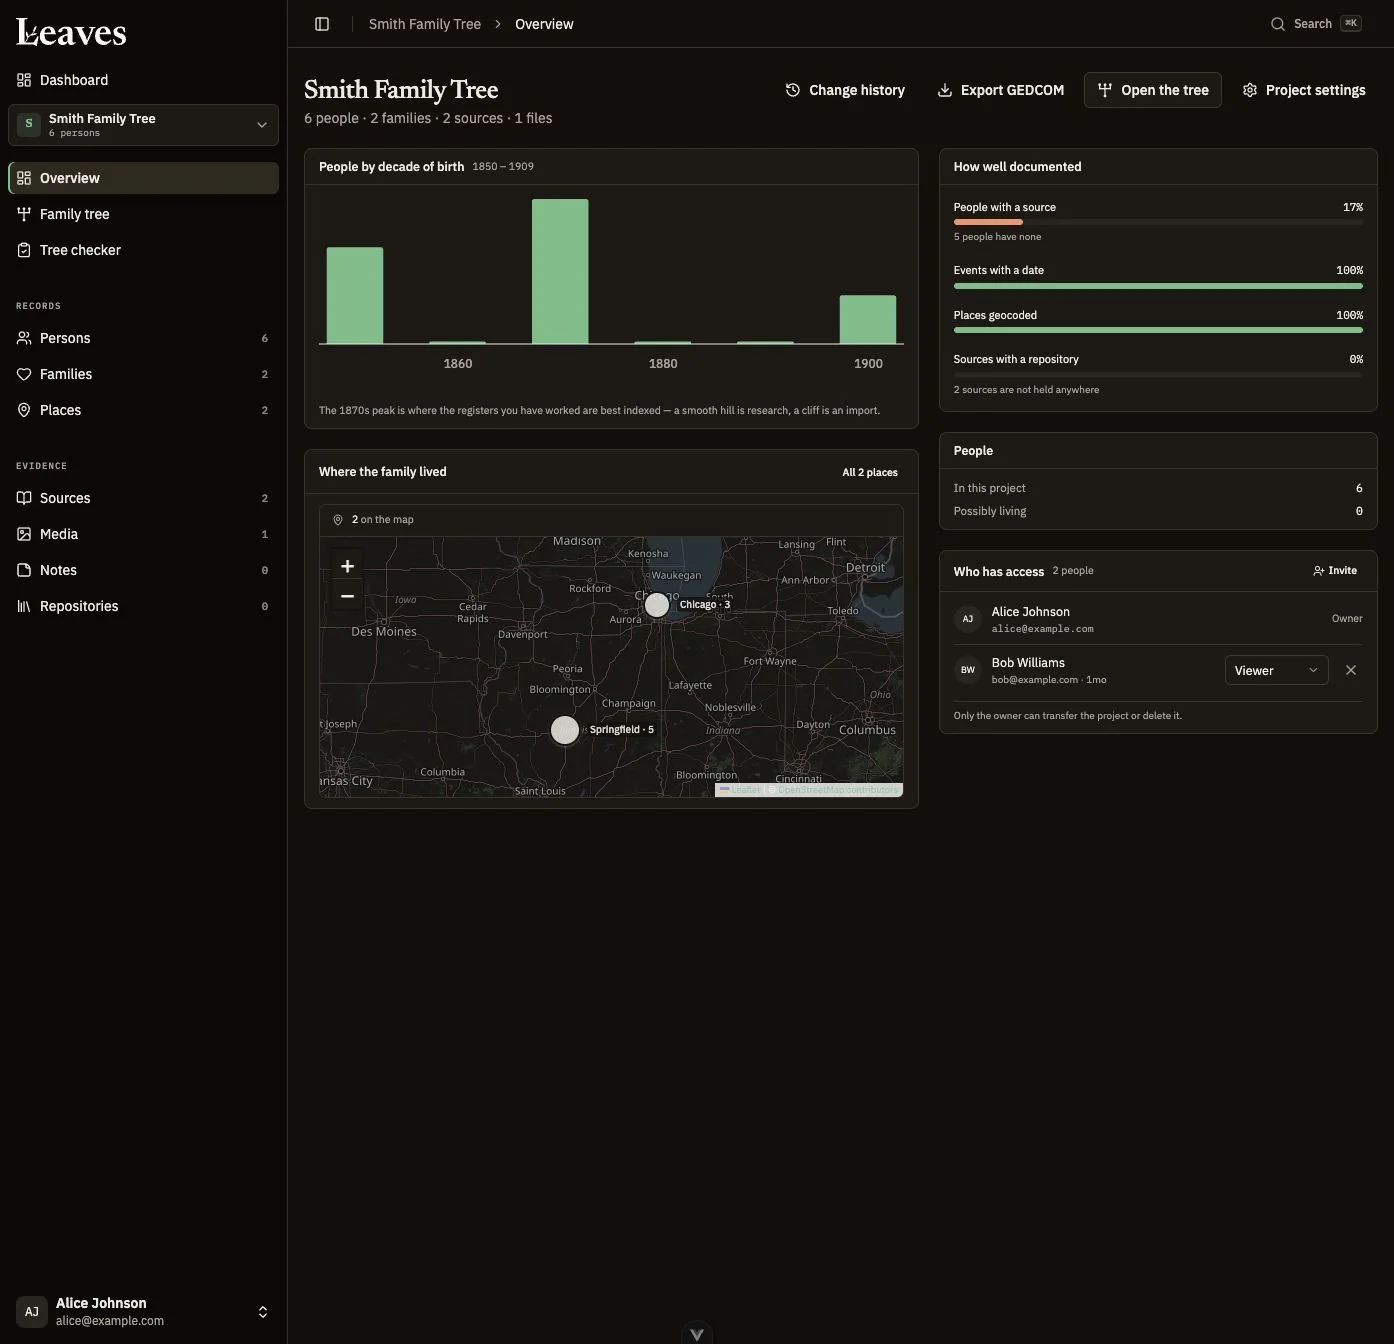
- 1Project settings applies to this project.
- 2Select a birth decade to open matching persons.
- 3Documentation indicators link to gaps.
- 4Who has access manages collaboration.
Figure 2 — Overview. The chart and map lead into records; documentation indicators identify research gaps; project settings and access controls apply to this collection.
Start an empty project
- Open Dashboard and choose New.
- In New project, choose Create, enter Project name, and optionally Description (up to 255 characters each). Choose Create project. The Import GEDCOM tab starts the import wizard instead.
- Open Persons, create a first person, and set them as the focus person.
- Add relatives and evidence as described in the following sections.
An owned-project limit can prevent creation. Importing to A new project also uses an owned-project slot. A project shared with you does not become yours merely because you can edit it.
Change project settings
- Open the project's Overview and choose Project settings.
- Edit Name, select Focus person, or change Let collaborators export GEDCOM where your role allows it.
- Complete the sheet's save action and check the saved message.
The focus person changes where the tree opens. It does not change parentage or make that person more important than anyone else in your research.
Transfer ownership — owner only
- Ensure the intended recipient has accepted a collaborator invitation.
- Export the project and agree who will maintain and pay for it.
- Open Project settings → Transfer ownership.
- Choose the collaborator and select Transfer ownership.
- Review Hand this project to …? and confirm only when the recipient is correct.
The recipient becomes owner and can delete or transfer the project. You remain a collaborator with Admin access. The recipient's project and storage allowance must accommodate the transfer. There is no one-click reversal; the new owner would need to transfer it back. Do not assume your living-person visibility remains identical after becoming a collaborator.
Delete a project — owner only
- Export any research and media you need to retain.
- Open Project settings → Delete project.
- Read the displayed record/file impact and confirm the named project.
Warning: this permanently removes the project's persons, sources, files, and other project records. Everyone shared on it loses access. There is no normal project trash or restore workflow. For reversing an eligible import, use Undo this import instead.
5. Persons, names, facts, and dates
Find a person
Open Persons and search or refine the list. Available refinement includes missing information, source coverage, gender, and birth-related criteria where offered. Use a birth-decade link from Overview to begin with a time filter. Open the result and check names, dates, family, and evidence before editing; matching names do not establish the same identity.
Sort by Last Name (A–Z), Last Name (Z–A), First Name (A–Z), First Name (Z–A), Recently Added, or Oldest First. The gap filters include No source, No birth date, Date is only text, No parents, and Possibly living; Born between narrows birth years. Surname letters and gender choices provide additional refinement. A person with an unstructured date can match a text-date gap even though a date phrase is displayed.
Create a person
- Choose New in Persons.
- Enter what you know in Given name, Surname, Gender, and Born.
- Choose Create person. Use the save-and-add-another option if you have several people to enter.
- Open the saved person and add facts, relatives, and evidence.
At least a name, gender, or birth information is needed; you can start with a partial identity. Gender choices include Male, Female, Intersex, and Unknown. A newly created minimal person is still a real record, not a temporary search result. Search first to avoid creating a duplicate from a picker.
Read a person page
Facts and events lists recorded claims. Citation badges lead to supporting evidence; discussion icons lead to conversations about the fact. Timeline distinguishes exact points, partial/ranged/period bands, and approximate points, and can include relatives' facts. Family shows relationships. Names can hold more than one name. Evidence collects sources, media, and notes. What is missing identifies gaps such as an unsourced birth or absent parents. Access and Record data describe restriction and provenance.
A gap means information is absent from the project, not that an event never happened. A computed age or relationship depends on entered data. Follow the displayed relationship path if an unexpected relationship label appears.
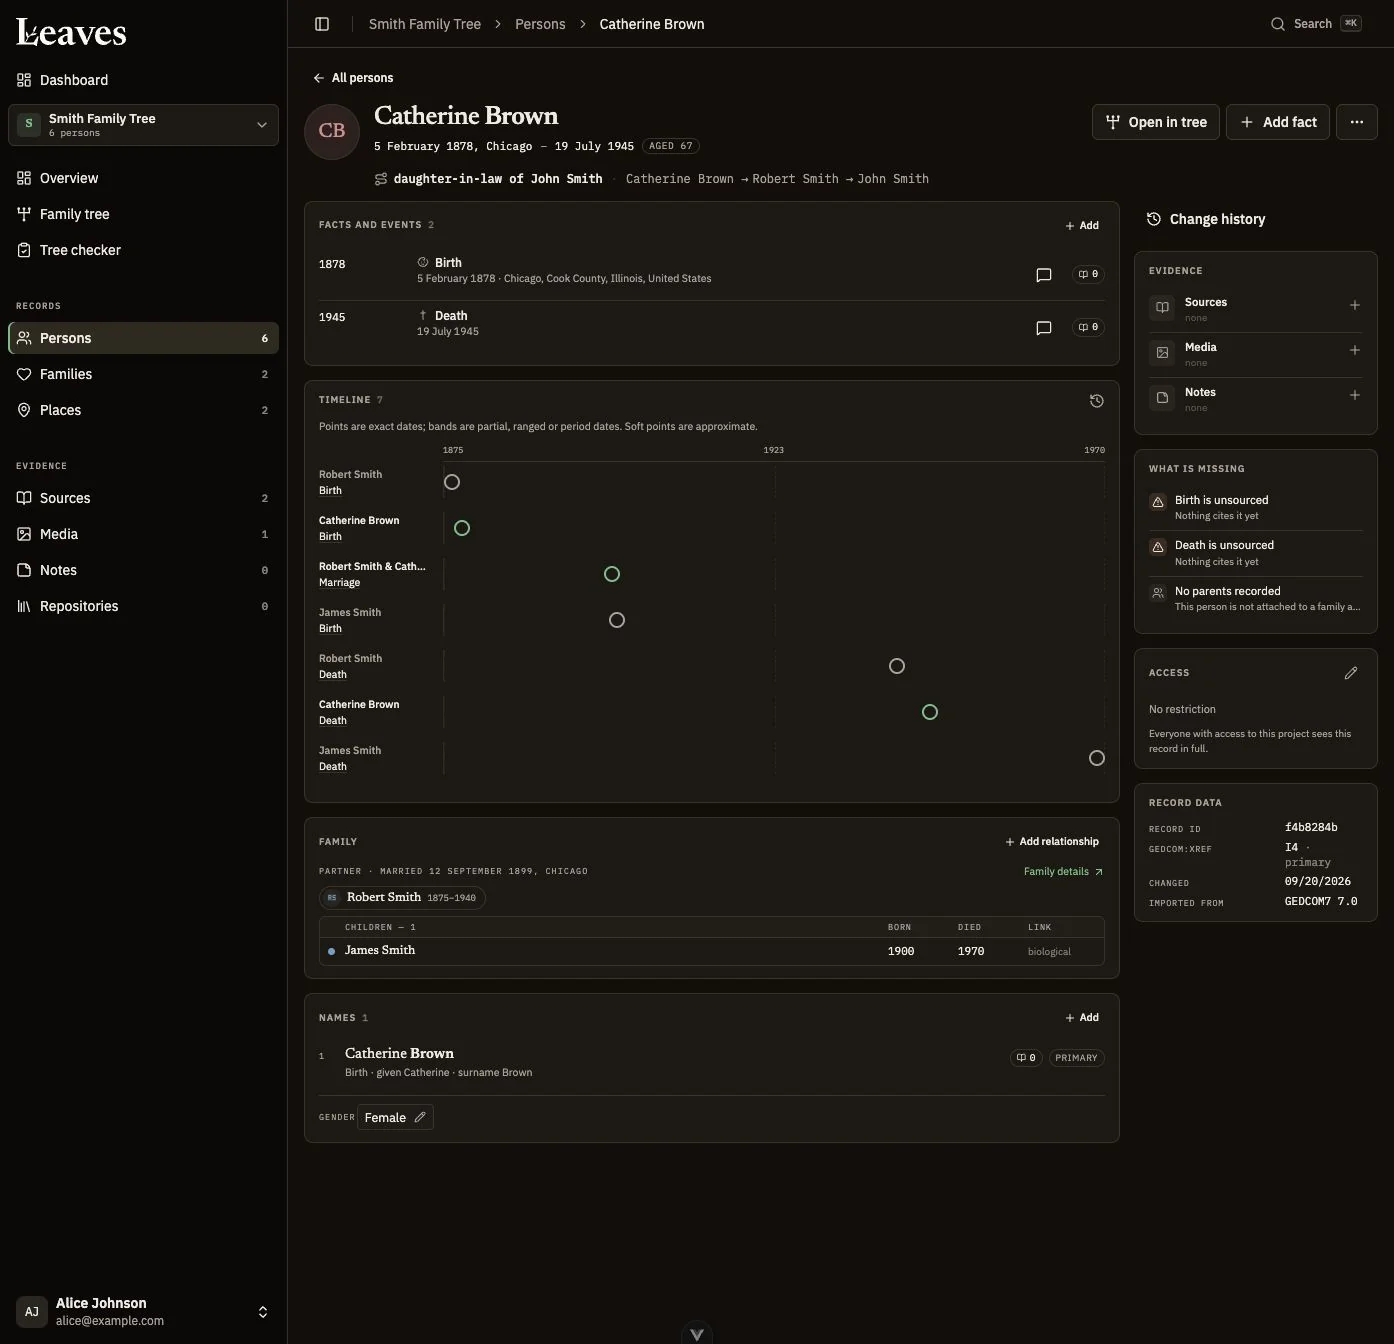
- 1Facts have separate citations and discussions.
- 2Timeline contextualizes the recorded dates.
- 3Evidence and gaps identify follow-up work.
- 4Family contains structural relationships.
Figure 3 — Person page. Facts and citations are at the top; the timeline contextualizes the dates; Family supplies structural links; Evidence and What is missing guide further research. Lower down, Names separates identity from events.
Add or edit a name
- In Names, choose Add, or open an existing name for editing.
- Choose Type: Birth, Married, Also Known As, Nickname, Adoptive, Formal, or Religious.
- Enter the known parts: Prefix, Given, Nickname, Surname prefix, Surname, and Suffix as applicable.
- Check Reads as and Sorted under, then choose Save name.
- Cite the name's source when available.
Separate a surname prefix when appropriate: a surname such as “van der Bergh” can display with its prefix while sorting under Bergh. Multiple names document variation; they are not duplicate persons. The only remaining name cannot be deleted through the name-delete action.
Add or edit a fact
- Choose Add fact or Add in Facts and events. Open an existing fact to edit it.
- Choose Type. Common examples are Birth, Baptism, Christening, Death, Burial, Residence, Occupation, Education, and migration events. Family events include partnership events such as Marriage and Divorce.
- Open Date and enter only the precision the evidence supports; see the date procedure below.
- Search Place, select an existing place, choose a location suggestion, or use the offered free-text option.
- Add Note and optional Confidence: Not assessed, High, Medium, or Low.
- Choose Save fact and check the result.
- Cite the source on this specific fact, rather than only on the person.
A type is enough to create a fact; a date and place may be unknown. Leaving them blank is preferable to inventing them. The fact-type menu contains many imported genealogy concepts. A fact whose label describes a relationship does not itself create a structural parent/child link; use Add relationship for that.
Fact confidence assesses your claim. Citation confidence assesses the evidence supporting it. Conflicting claims can coexist while research continues; do not silently overwrite a sourced date to remove a warning.
Enter historical and uncertain dates
- Open a fact's Date control.
- Choose the date shape in the following table.
- Enter known components and any applicable qualifier.
- Expand Calendar, era, dual year and time only if the document requires those details.
- Read the displayed interpretation, choose Apply, then save the parent form with Save fact.
| Shape | Use when | Example |
|---|---|---|
| One date | One point with known precision | 5 February 1878, or simply 1878 |
| A range | The event happened somewhere within bounds | Birth between 1876 and 1878; one missing bound means before/after |
| A period | A condition continued over an interval | Residence from 1901 to 1908; one end may be open |
| Described | The source's wording cannot be reduced confidently to a date | “the winter after the flood”; optionally Place it roughly for a year |
For one date, choose exactly, about, calculated, or estimated. Year-only precision is not 1 January. The editor also supports decade and century precision. Leave unknown day/month empty. An approximate birth should not become an exact date merely because a year can be calculated from a census age.
Advanced calendars are Gregorian, Julian, Hebrew, and French Republican. The era can be CE/BCE. Dual years retain a notation such as 1750/51. Time accepts hours 0–23 and minutes 0–59. The year range is 1–99999; invalid days/months are rejected according to the chosen calendar. Preserve impossible or ambiguous source wording under Described instead of forcing an invalid exact date.
Clear date clears the date from the form; it does not delete the fact. Display preferences change formatting, not stored precision. Approximate, dual-year, and non-Gregorian values keep the spelled form where numeric formats could misrepresent them.
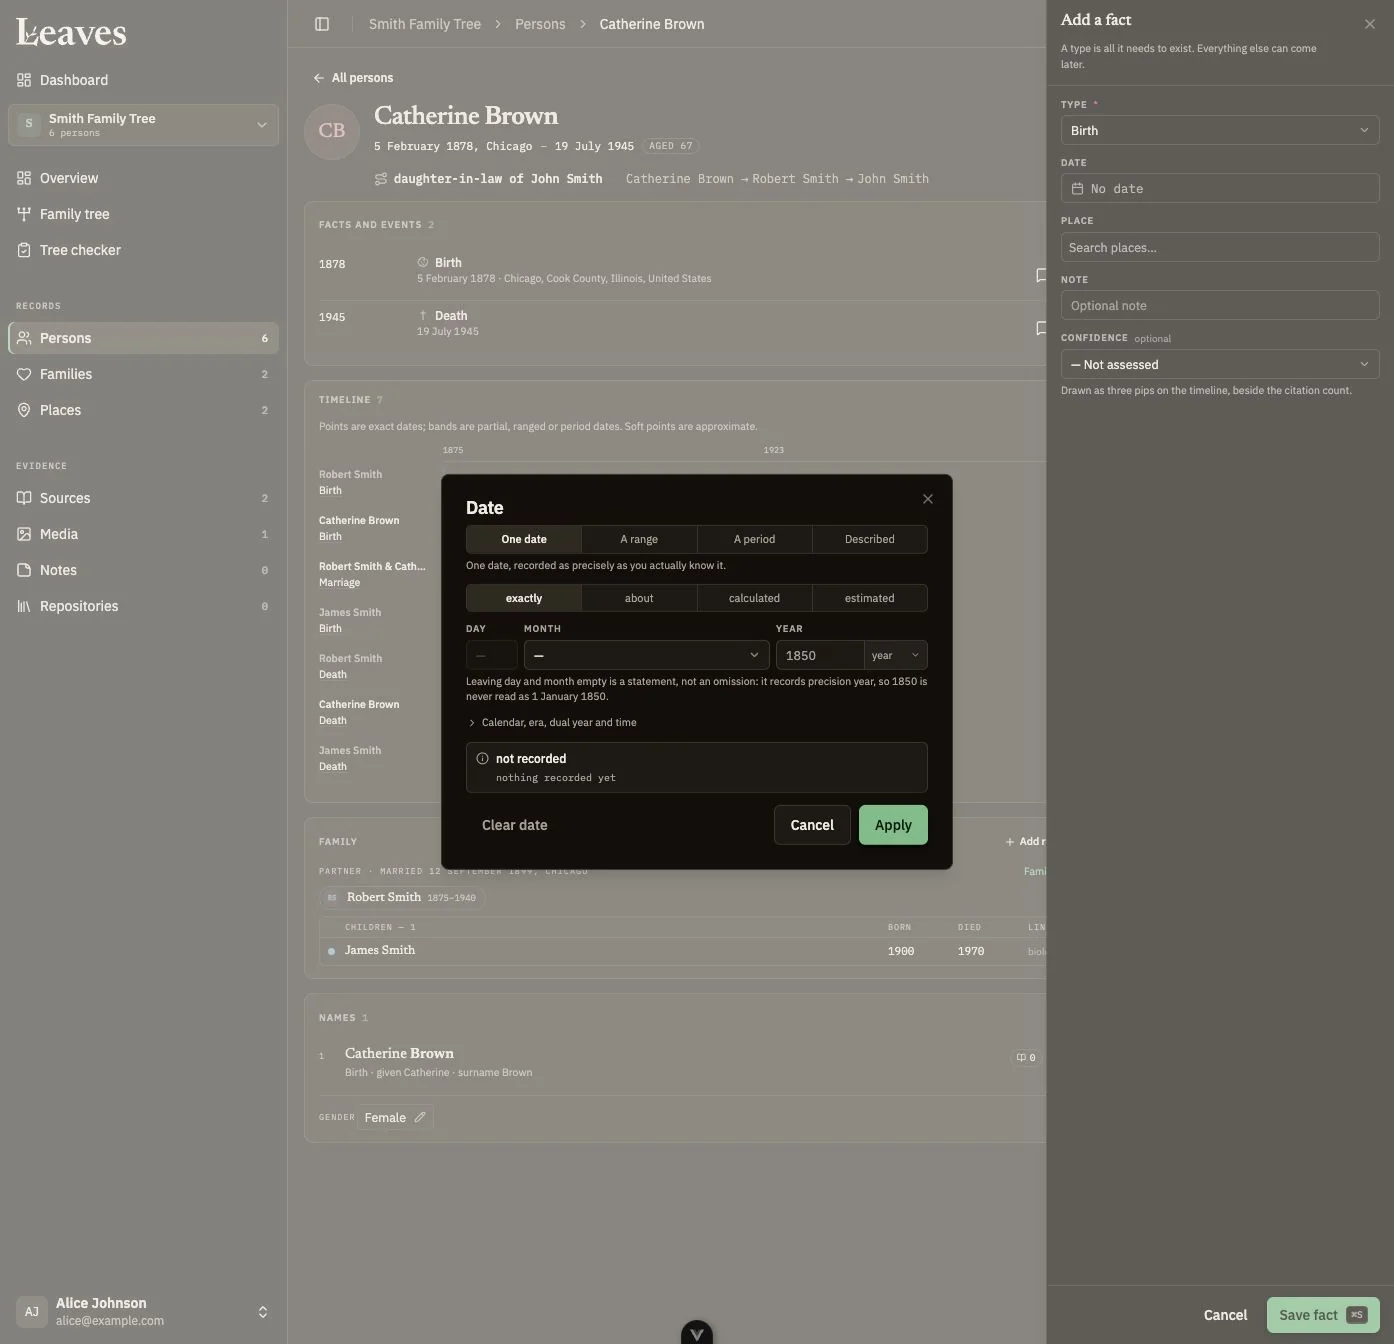
- 1Choose a date shape.
- 2Keep only known precision.
- 3Advanced calendar details are optional.
- 4Apply returns to the fact draft; Save fact commits.
Figure 4 — Date editor. Choose a shape, then precision and qualifier. The advanced disclosure is optional. Apply returns the value to the fact sheet; Save fact is still required. The faint year placeholder is not a recorded date.
Other person actions
Open in tree centers the tree on this person. The overflow More menu supplies actions such as merge, setting the person of interest, and deletion when permitted. The person of interest/focus controls the project's tree starting point; it does not move records between projects.
Deleting a person is an owner action. Review the impact dialog: family links and dependent facts/citations are affected, but other people are separate records. If you meant only to detach someone from a family, remove the relationship instead. If two records describe the same person, compare and merge rather than deleting one blindly.
6. Families and relationships
Find a family
Search A partner’s or a child’s name. Sorting offers Partner (A–Z), Partner (Z–A), Married (earliest), Married (latest), Recently Added, and Oldest First. The Shape filters distinguish Two partners, One parent only, No children recorded, and Childless by record. Union filters include Married, Unmarried partners, Divorced, and No marriage date. Gaps include Unsourced marriage, Birth gap over 5 years, and Date is only text. No children recorded means missing data; Childless by record is an explicit claim.
Create a family
- Open Families and choose New family.
- Select at least one person as a partner. Search existing people before creating a new one from the picker.
- Enter the union Type, Date, and Place if known.
- Choose Create and open.
- Add children, relationship types, later family events, and supporting citations on the family page.
A family is useful even when one partner is unknown or the union is undocumented. Two family records may represent different partnerships, so matching members are not enough to justify merging them. The partner editor supports up to two partners. Review the original relationships before changing more complex imported families.
Add a relationship from a person
- Open the person and choose Add relationship in Family.
- Choose Parent, Sibling, Partner, or Child.
- Select an existing Person, or create a minimal person from the picker when no match exists.
- Select an existing Household or the offered new-household choice.
- Read the description of what the change will create, then save the relationship.
Choosing Sibling connects people through a household; it does not by itself prove that they share both biological parents. Check the household and each parent-child type. A person can have more than one family connection, for example a birth family and an adoptive family.
Add partners or children on a family page
- Open the family and find its partner/children section.
- For Add partner, choose the correct person. Choosing a name adds them straight away: this picker is not merely preparing a draft.
- For a child, choose the person, review each parent-child relationship, and record the membership status where offered.
- Save and reopen the family to verify the people and labels.
Per-parent options include Biological, Adopted, Foster, Sealed (LDS), Raised by them, Surrogate, and Unknown. Membership Status can be Proven, Challenged, or Disproven. Status is a statement about the family membership; it is not a separate confidence score for each parent.
Correct a parent-child relationship
- Click the child's relationship badge/link to open Edit parent-child relationships.
- Inspect the separate selector for each parent and Status.
- Check After saving and choose Save only when it matches your evidence.
- Add a source or a note explaining the conclusion.
Before saving an imported parent-child relationship, check each parent’s selected relationship type against your evidence. If a family summary and its editor disagree, keep a copy of the original information and ask the project owner to review it with you.
Ordering and removing family members
Children with usable birth dates are ordered by birth information. Undated children can use the offered First, After, or Last placement and supported drag controls; ordering is constrained around dated children. Tree Child order is a separate display choice. A suggested birth gap is a research prompt, not proof of a missing child.
Removing a partner or child from a family removes that link, not the person's record. Deleting a family removes the family record, membership links, and its dependent information; it does not mean deleting every member as a person. Review the impact before an owner confirms. Repeated Marriage/Divorce facts can represent distinct episodes; keep their evidence and investigate before merging them.
7. Explore the family tree
Open and move through the tree
- Choose Family tree in the sidebar, Open the tree in Overview, or Open in tree on a person.
- Drag the canvas to move around. Use Zoom in and Zoom out for scale.
- Choose the percentage control (Reset zoom to 100%), Reset view, or Fit all to recover a useful view.
- Select a person card to inspect that person in the tree's detail sheet. Follow its record-opening controls for the full page.
- Select a family connection where available to inspect the family.
The tree shows a bounded neighborhood around the focus, not necessarily every person in the project. An isolated person can exist in Persons without appearing in the current neighborhood. Missing ancestors may be outside the generation settings or simply not linked.
Adjust tree display
Open the tree's settings control. Under Generations, set Ancestors, Descendants, and Siblings. Ancestors can range from 0 to 8, descendants from 0 to 6; effective sibling depth is also bounded by ancestor depth. Under Child order, choose By birth date or By name.
These settings affect the displayed tree and are remembered locally per project. They do not modify dates, membership order, or evidence. Increase depth gradually on large trees to keep the view readable. If a branch seems missing, check both display depth and the actual relationship on the person/family pages.
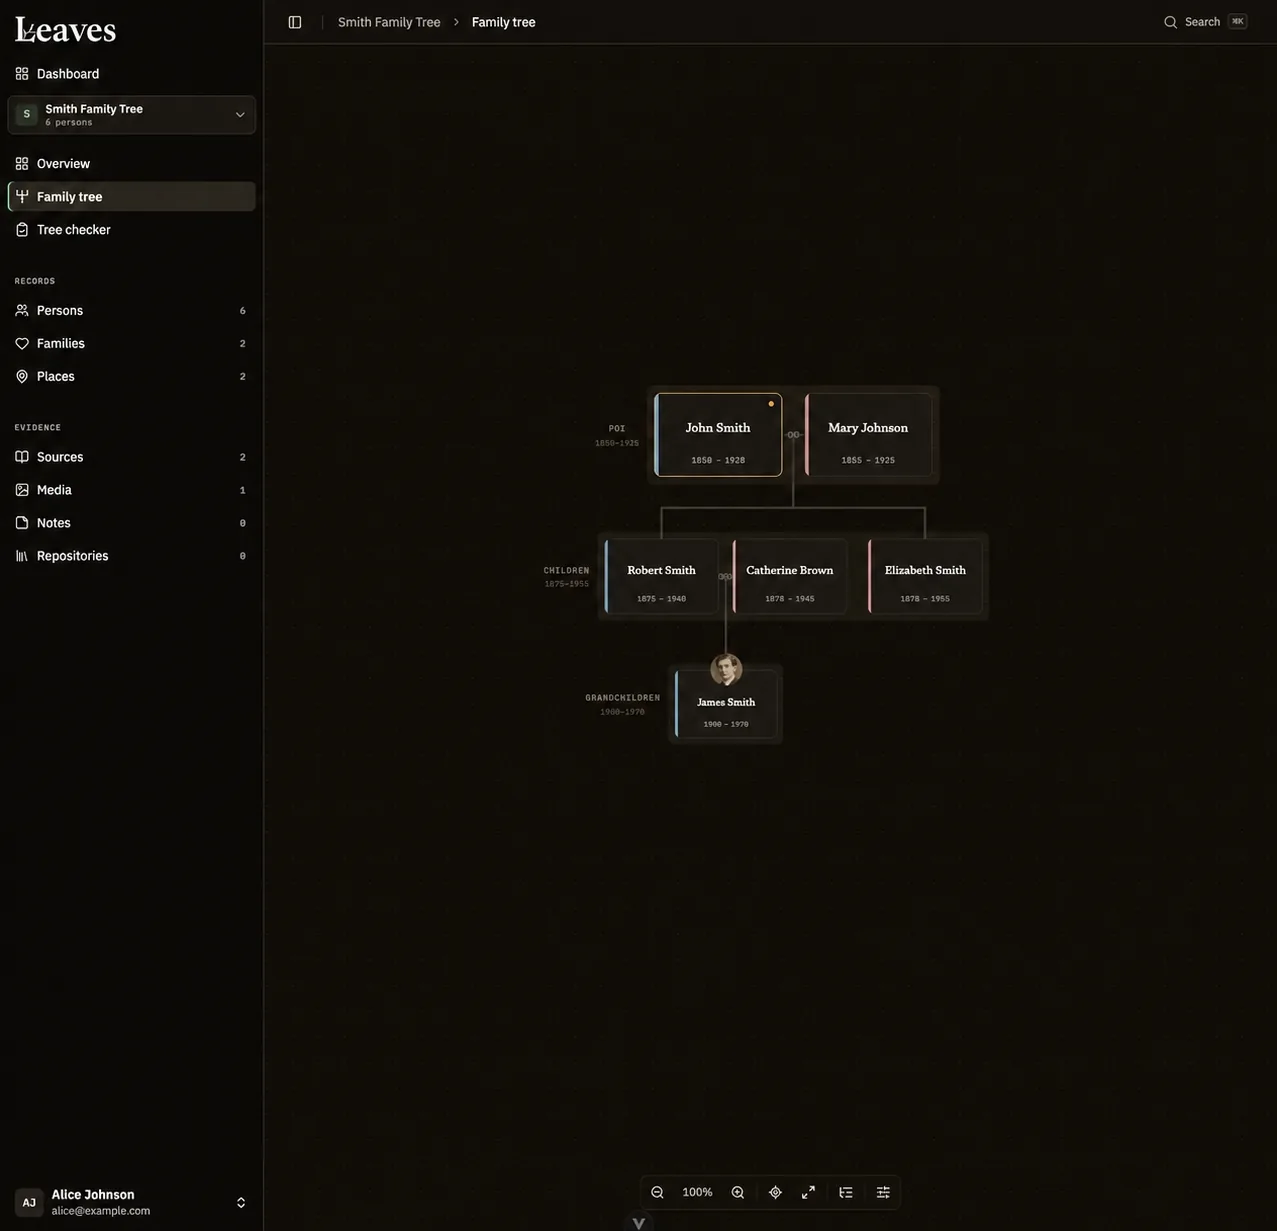
- 1Choose a person card to inspect it.
- 2Connections represent recorded relationships.
- 3Zoom, fit, reset, and generation settings.
Figure 5 — Family tree. Person cards and family connections form the canvas. The floating controls adjust scale, fit, and generation display; record sheets let you inspect without losing the tree context. The example portrait was generated with AI.
Use Export GEDCOM to move your research to another genealogy program. Printing this guide does not print your family tree.
8. Places and maps
Find and interpret places
Use Places to reuse a location across events. Search name, region, or country. Sorting includes Place A–Z, Place Z–A, Most events, and Recently added. Refinement can identify missing country/state/city, Not geocoded, Unused by any event, and Possible duplicate records.
A place's event list can group By type, By date, or By person. People connected links back to research. A map needs coordinates; the textual place can still be used without them.
Create or edit a place
- Choose New place, or open a place and edit Address & location.
- Use Search address to search the OpenStreetMap-based gazetteer, or choose manual entry.
- Review the city, municipality, state/province, country, country code, and coordinates. Do not replace historical jurisdiction with a modern suggestion without considering the source.
- When a selected suggestion locks the address fields, use Edit manually if you need to change them.
- Add an explanatory note where useful and save.
At least one address component is required. Text address components are limited to 255 characters; country code is two letters. Latitude must be −90 to 90 and longitude −180 to 180. For manual coordinates, use the map's click/drag behavior or coordinate fields; Clear coordinates removes the pin without erasing the place's text.
In a fact's place picker, location lookup begins at three characters. Choose an existing place to avoid duplicate spellings. The offered Use … free-text option keeps a text location without necessarily creating a fully mapped place.
Locate an unplaced record
- Open an unlocated place and choose the available geocoding action.
- Review the candidate location and map.
- Accept only a location that matches your intended place, including the correct country and historical context.
In review/batch geocoding, unambiguous suggestions can be preselected. Check each selection before Accept … commits coordinates. A gazetteer match is a modern location suggestion, not proof that a historical settlement or boundary was identical.
Consolidate duplicate places
- Open the consolidation action from Places or an import report's Consolidate link.
- Review the grouped candidates and their certainty/review tiers.
- Keep historically distinct places separate even if their names resemble one another.
- Select genuine duplicates and choose Merge selected, or inspect a pair using the merge preview.
- Review per-pair results; a batch can partly succeed and partly fail.
This is permanent owner work. Export first. “Delft”, “Delft, ZH”, and “DELFT” might represent one location, but identical names alone do not settle identity. See merge rules.
9. Sources and citations
Find a source
Open Sources. Search title, author, publication, or transcription. Sort by Title A–Z, Title Z–A, Most cited, Least cited, or Recently added. Refinement includes source kind, repository, Never cited, No transcription, and No scan attached.
A source page leads with Citations and can group them By record, By confidence, or By page. Transcription displays source text; Scans contains attached media; Records covered describes the source's scope; Bibliographic describes it; Held at identifies repositories and call numbers. Imported source fields can be richer than the current creation form.
Create a source
- Choose New source, including from the source picker while citing evidence.
- Enter Title. Optionally enter Author, Repository, Call no., and Format.
- Choose Create and open.
- Attach scans and citations as appropriate.
Only Title is required. Format describes the archive item, with choices such as Book, Manuscript, Microfilm, Digital file, Photograph, Audio recording, and Other. A source's Video format is bibliographic metadata; it does not mean video-file upload is supported.
To record a transcription or describe a source’s coverage, create a research Note and attach it to the source. Give it a clear subject, such as “Transcription: census page 44”. Keep the copied text separate from your interpretation.
Cite evidence on a fact, name, or record
- Open the specific fact or name's source/citation control, or Sources in the record's Evidence panel for a record-level citation.
- In Cite a source, select Source; create one from typed text if necessary.
- Enter Page (or entry), such as “44, entry 112”.
- Choose Role in the event if meaningful: Principal, Participant, Official, Witness, or not recorded.
- Choose Confidence where you have assessed the evidence: High, Medium, or Low. An unassessed citation is shown as Not judged.
- Use What the source says for the relevant quotation, keeping interpretation in a note.
- Choose Add citation; when revising a citation choose Save citation.
Example: cite an 1880 census on an approximate birth claim, record page 44, quote the stated age, and explain the calculated year in a note. A record-level citation asserts the person's existence or the union generally; it is not as precise as citing the Birth fact itself.
Confidence is your assessment, not an automatic certification. The interface's guidance associates stronger confidence with primary/direct evidence and lower confidence with hearsay or guessing; choose based on the particular claim, not merely the prestige of the archive.
Remove citation removes the evidence link. It does not delete the source or its scan. Other citations to that source remain.
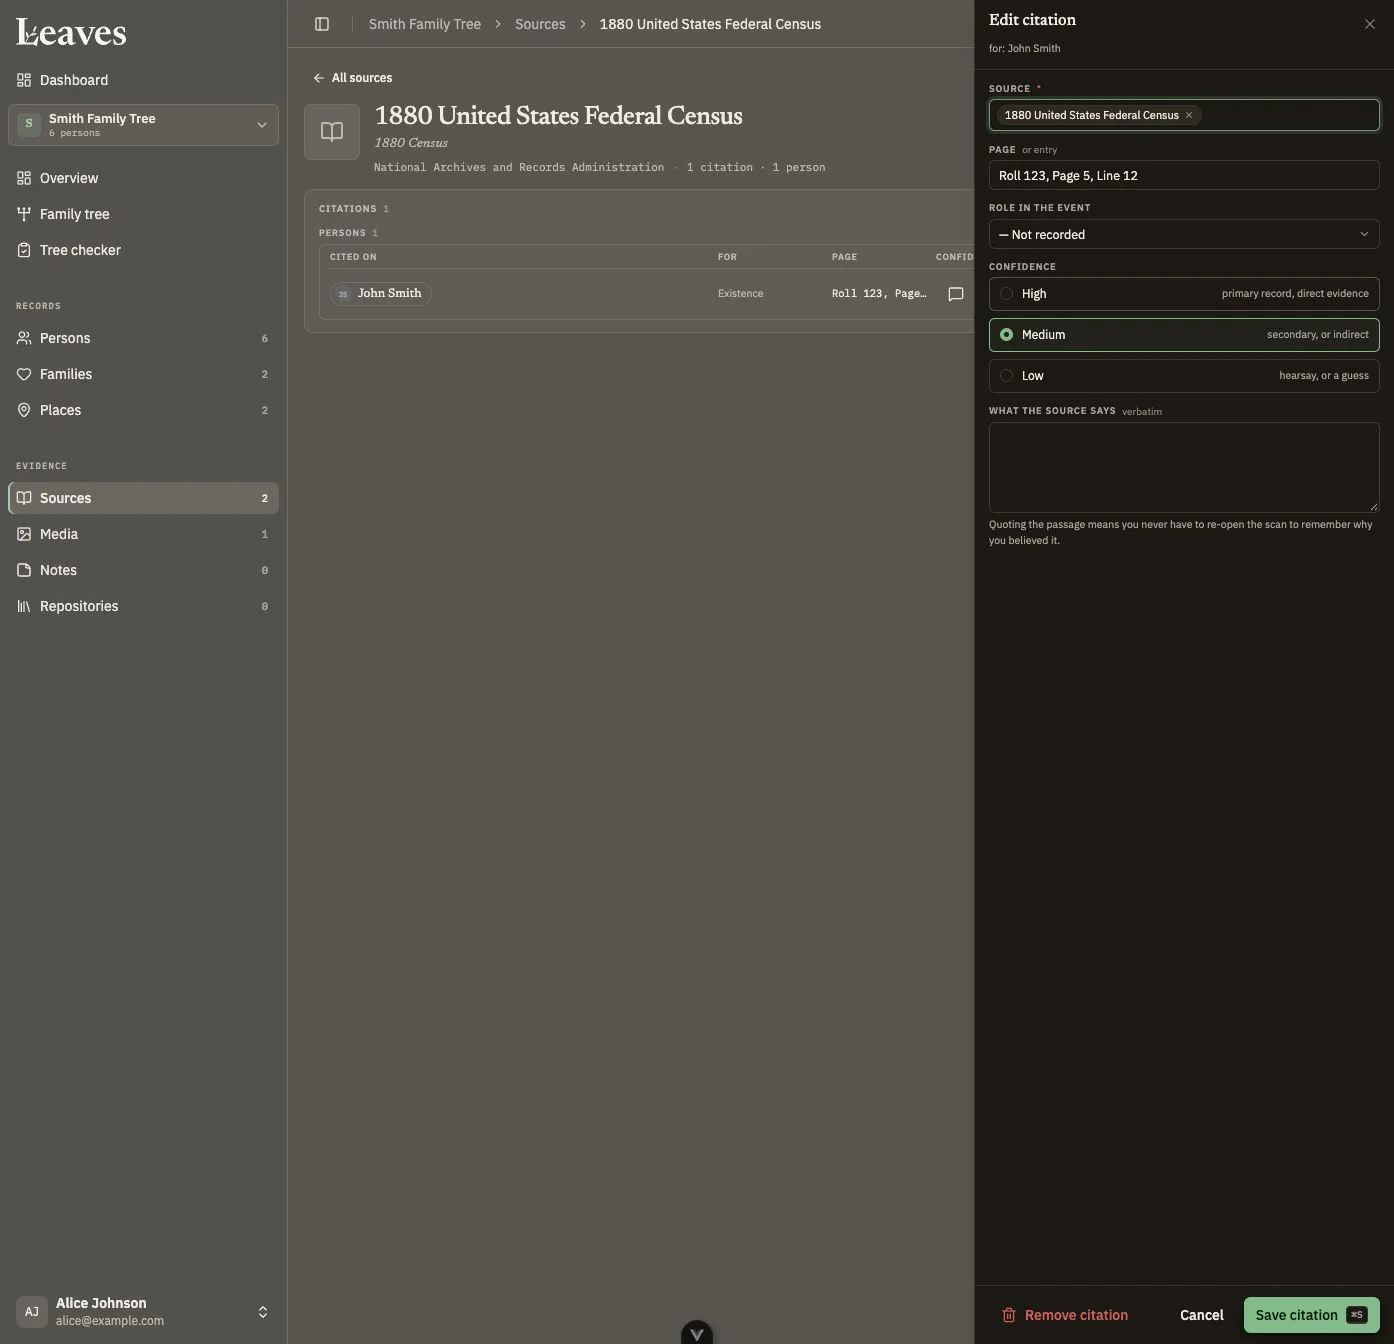
- 1Check the chosen source and target.
- 2Record the page/entry and role.
- 3Confidence and quotation belong to this citation.
- 4Save citation commits the link; Remove citation unlinks it.
Figure 6 — Citation. Check the target record/fact, source, page, role, confidence, and quoted text before saving. The link is the evidence relationship, not a duplicate of the source.
Link one source to many people and facts
- Open the source and choose Link people and facts when available.
- Choose existing persons, families, facts, or names as citation targets.
- Review the scan/transcription alongside each target.
- Enter each row's page, confidence, role, Role as written, and quotation where offered.
- Save the displayed number of links and address highlighted row errors.
Up to 100 targets are accepted per batch. Role as written is limited to 255 characters. Validation is performed for the batch: invalid rows prevent those new links from being saved as a successful batch. Already-cited targets are not new evidence merely because selected again. Choose the targets yourself; Leaves does not infer the people from the scan.
Delete a source
The owner can choose Delete source from its overflow menu. Review all affected citations and holdings before confirming; deleting evidence description is different from removing one citation. Linked media is its own record, so use the dialog impact to check which links are removed. The source detail uses a seven-second Undo grace period before committing deletion; use it immediately if mistaken. Once deletion completes, the source cannot be restored through Undo.
Add evidence scans and repository holdings
Upload or select Media, then link it with Evidence for to this source. A scan attached only as Depicts is not the same source scan relationship. Use Repositories to record where the source is held; call number and format belong to that source/repository pairing. Several repositories can hold the same source in different forms.
10. Media and portraits
Upload files
- Open Media and choose Add files, or use an upload action from an evidence panel.
- Drop files into the drop zone or choose them with the file picker.
- Follow progress in the upload tray. Retry failed items; cancel remaining transfers if you selected the wrong batch.
- Describe successful uploads, or choose Later to leave descriptions for another session.
- Reopen each file to verify its content and links.
You can upload JPEG, PNG, WebP, GIF, TIFF, PDF, MP3/MPEG audio, MP4 audio/M4A, WAV, and OGG audio. The file limit is 50 MB each, and your account must have enough media storage. Convert unsupported files to a supported format before uploading: renaming an extension does not convert a file.
The tray may offer Retry as JPEG for an image your browser can decode. This creates an image conversion; retain your original separately if format fidelity matters. Background transfer means you may continue within the app while it runs; closing or reloading the uploading tab should not be treated as a guaranteed continuation.
Find files
Search Media and refine Kind, Attached to, or Storage. Attached to can target A person, A family, A place, A source, or Nothing. Storage includes Over 10 MB, Duplicate checksum, and File is missing. Sorting offers Newest first, Oldest first, Date taken, Largest first, Most attached, and Least attached. Use Nothing/Least attached after an archive visit to finish linking uploads. A missing-file record is not the same as an empty caption.
Describe and connect uploaded media
- Choose a Kind: Photograph, Document scan, Headstone, Map, Audio, or Other.
- Enter a useful Caption.
- Choose Evidence for if this is a source scan.
- Choose Depicts to connect the record(s) shown or described by the file.
- Review Access, then choose Save all for the description batch.
Uploads are stored before the optional description stage. A description failure does not mean the successful files need to be uploaded again. Reopen Media before retrying to avoid copies.
Sharing media: Access offers Public, Collaborators, and Private within your project. Public does not publish the file on the internet. Before sharing sensitive photographs or documents, confirm with the intended collaborator that they can see only the information you want to share.
View and download
The file detail has Links, File, and History areas. Images have fit, zoom, and pan controls; 0 fits an image and arrow keys pan in its viewer. PDF viewing can open a separate browser tab; audio files have playback where supported. Use the original-file download control to retain the actual bytes rather than a thumbnail.
File URLs can expire. If an old opened image/PDF link fails, reopen the media record to obtain a fresh authorized link. A thumbnail is not evidence that an imported original file exists. Missing-file references can be present without file bytes.
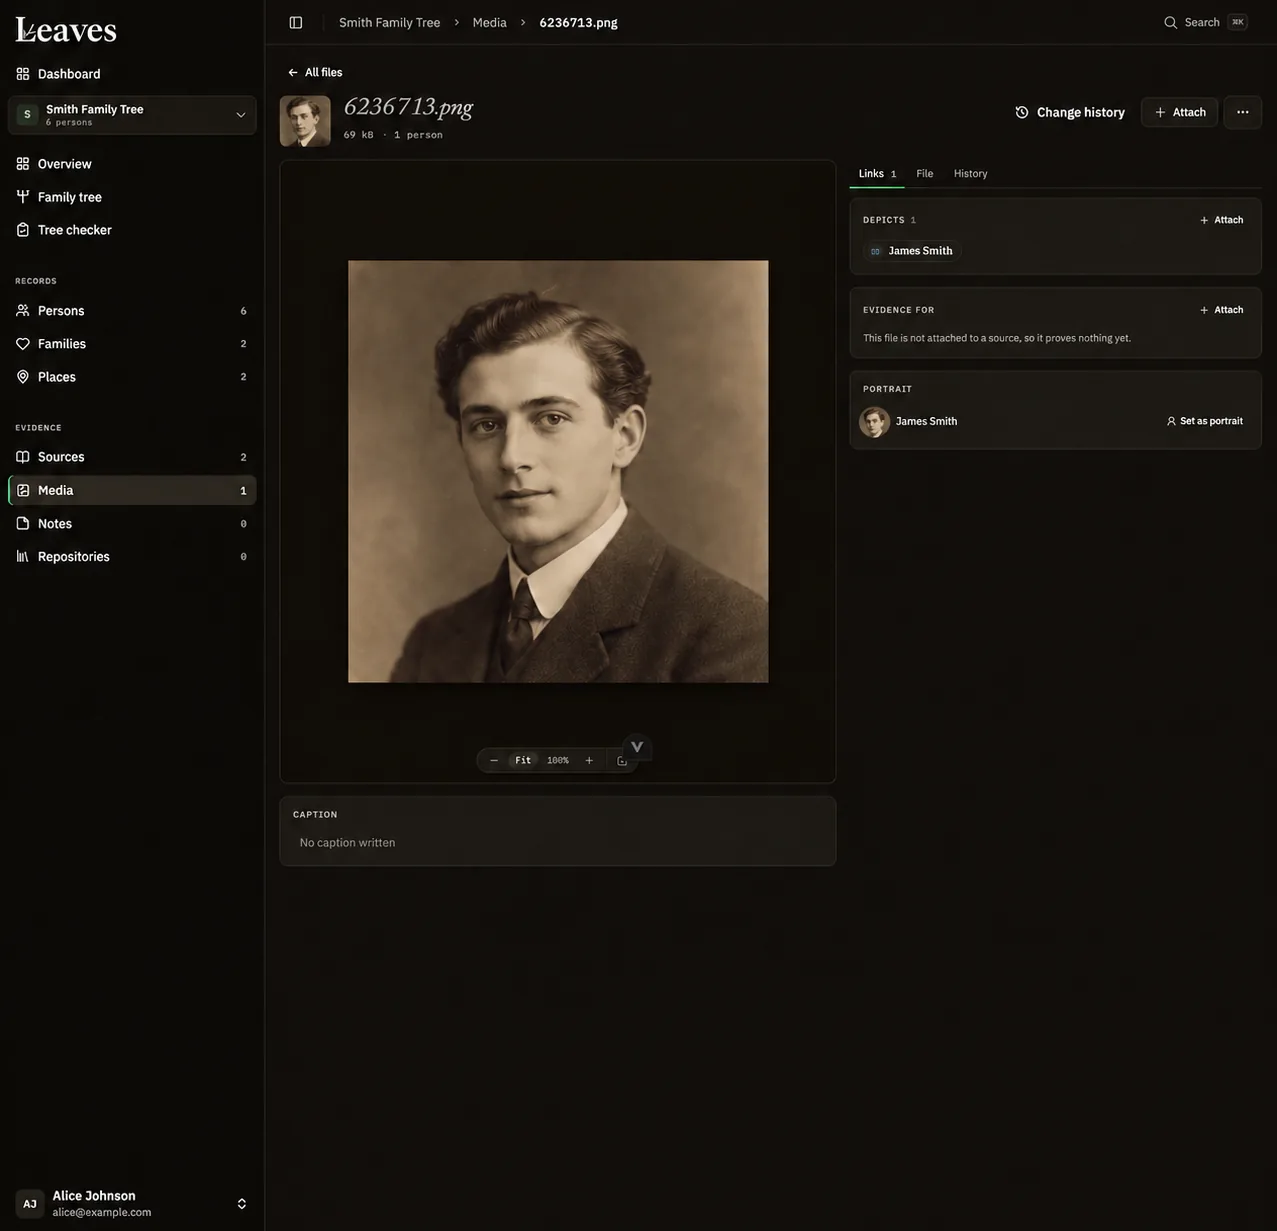
- 1Image viewer: original file and controls.
- 2Depicts identifies the subject.
- 3Evidence for connects a scan to its source.
- 4Choose a portrait for the linked person.
Figure 7 — Media links. The file preview is separate from the links. Depicts identifies subjects; Evidence for connects a source scan. A portrait is selected for a depicted person, not for the whole project. The example portrait and its thumbnails were generated with AI.
Set a portrait
- Open an image linked to a person through Depicts.
- Choose Set as portrait for that person.
- Adjust Zoom, Horizontal, and Vertical, or use Whole image.
- Save the crop and verify the person's displayed portrait.
Cropping is per person/link: several people in one photograph can have different portrait crops. Remove as portrait removes the portrait choice while retaining the image and its depiction link. It does not erase the original photograph.
Bulk actions and deletion
Select visible Media items, then use Attach to a record, Set kind, or owner-only Delete where offered. A blank kind can clear classification. Check which rows and page are selected before a bulk action.
The delete preview identifies dependent links and portraits and can offer unlinking all records as an alternative to deleting the file. Media deletion has no Undo because it removes original bytes. Deleting the file removes it and its associations; unlinking a depiction or source attachment retains the file. Deleted media cannot be recovered through a trash folder. Checksums can identify identical bytes; two scans of the same page with different compression are not necessarily byte duplicates.
Missing imported files: an imported media reference may exist without its original file. Keep the original media folder or archive. Upload the missing files and check their attachments before assuming they are connected to the imported records. If a file remains missing, contact Leaves for help rather than repeatedly uploading the same folder.
11. Notes
Use Notes for reasoning, hypotheses, transcriptions, research tasks, and explanations that do not belong in a short fact field. A note can be attached to several records; it is one shared text, not a copy for each attachment.
Create and attach a note
- Choose New note in Notes or the note action in a record's Evidence area.
- Enter Subject and/or Note. At least one must contain content.
-
Choose Text or Markdown and, where useful, a language code
such as
enornl. - Attach the intended record if creating from the index; creating from a record can establish that link automatically.
- Complete creation and check the note's attachment list.
The index's attachment picker supports persons, sources, and places. Family-linked and other imported links can also be displayed or created through their record-specific evidence controls. Imported HTML/XHTML notes retain their recorded type. For new notes, choose Text or Markdown.
Edit a saved note
- Open the note and edit the subject or body where permitted.
- Use the Text/Markdown mode deliberately; markup affects how the body is interpreted.
- Wait for All changes saved before leaving.
- If you see Not saved — your text is still here, keep a copy of your draft and use Retry.
Statuses include Unsaved changes and Saving. Editing a shared note changes it wherever it is attached. The project owner can edit saved notes. Language editing uses the choices shown; creation accepts a language code up to 20 characters.
Find notes
Search the Notes index and refine Attached to, Language, and Length where offered. Length includes Over 500 words and Under 20 words. The attachment filter helps find notes linked to a person/source/place or to nothing. Sort by Recently edited, Longest untouched, Recently added, Longest first, or Shortest first. Switch Reading/Table to compare excerpts or metadata. Unattached research stays in Notes but will not surface on a person until linked.
Suggestions and links
Mentioned in this note suggests possible names in the text. A suggestion is not an automatic identity link and can combine words incorrectly. Choose the correct existing person explicitly, or create a new person only after searching. Linking a suggestion is a research action, not proof that the name recognition was correct.
Remove an attachment to stop showing the note on a particular record without deleting its text. Deleting an attached note removes it from every linked record. The note-delete notification offers a seven-second Undo grace period; use it immediately. Once deletion completes, the note cannot be restored through Undo.
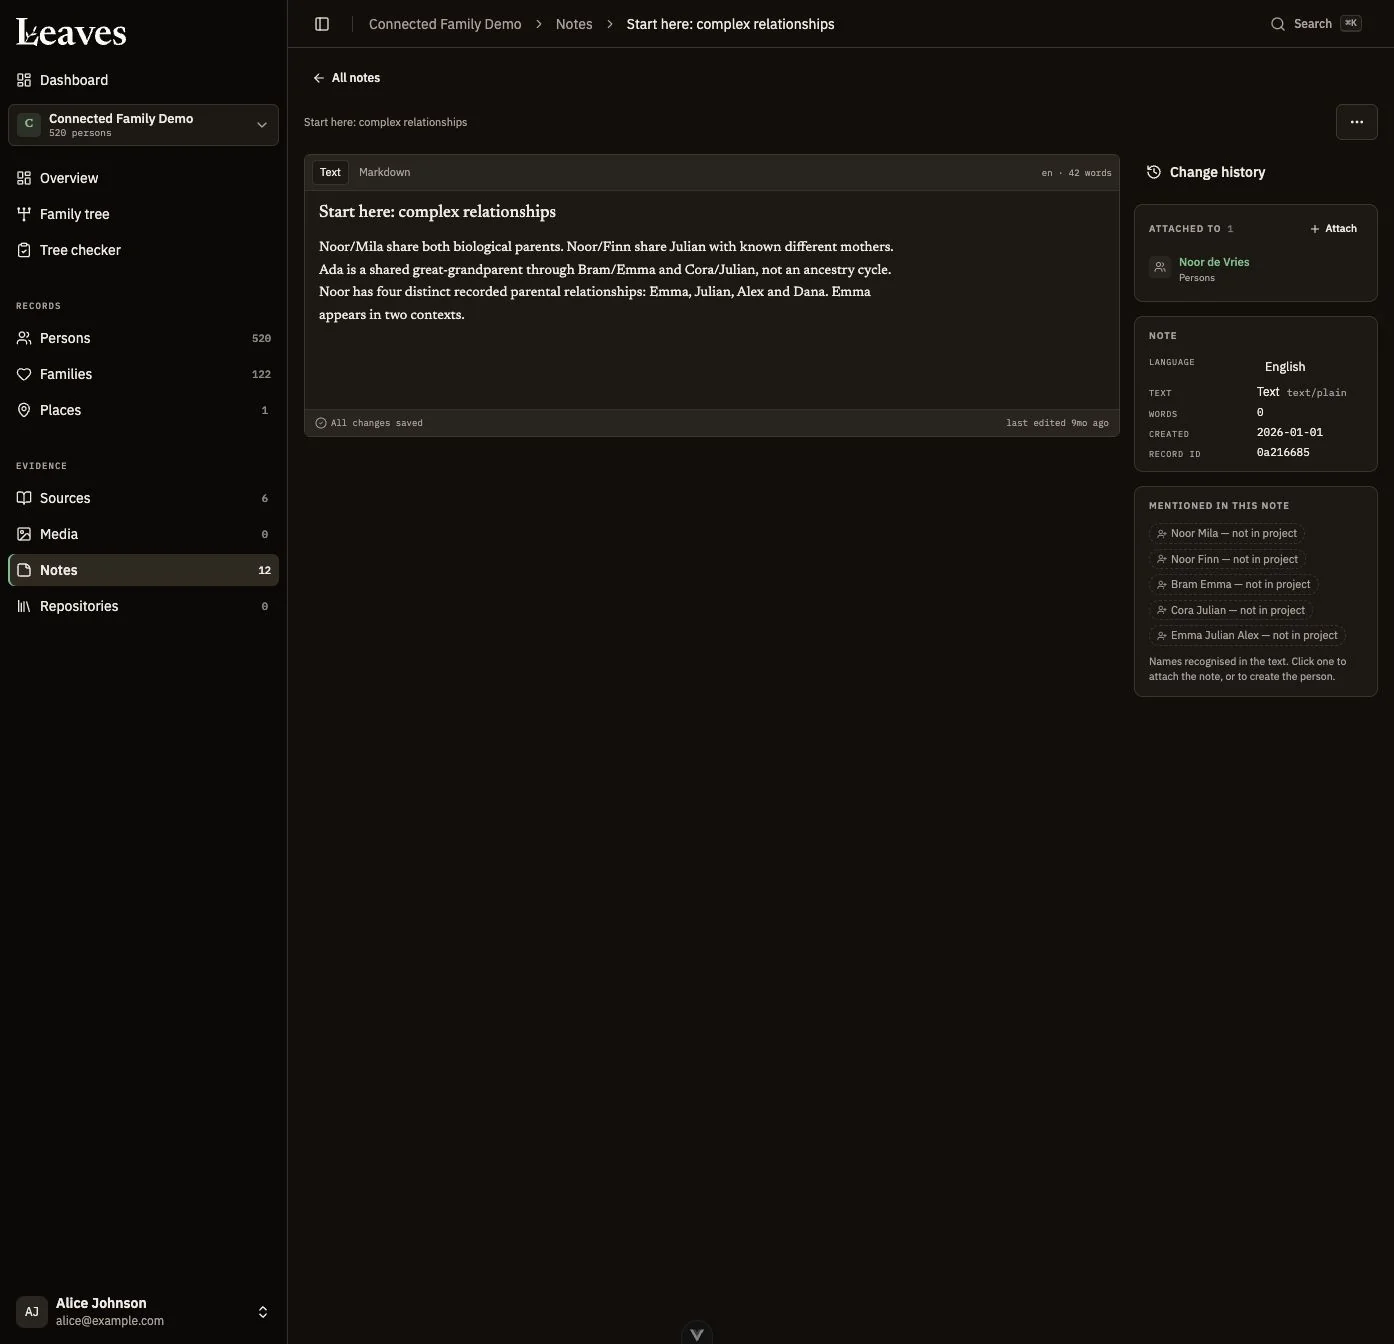
- 1One shared note body, with save status below.
- 2Attachments reuse this note.
- 3Suggested names require explicit review.
Figure 8 — Shared research note. The body holds the reasoning; attachments identify the records it accompanies. Name suggestions require an explicit decision and do not establish relationships.
12. Repositories
A repository records where you can obtain a source, including practical visiting/contact information. It is not another genealogy project or an application integration account.
Create or edit a repository
- Open Repositories and choose its new-repository action, or open an existing repository's edit control.
- Enter Name (required) and choose a kind: Archive, Library, Online, or Private.
- Search the address or enter street, postal code, city, state/province, and country manually. Repository fields remain editable after address suggestions.
- Add Website, Email, Phone, Fax, and a practical note as needed.
- Save and verify the contact details before relying on them for a visit.
The table searches Name, city, or call number and sorts Name (A–Z), Name (Z–A), or Most sources. It supports opening each repository; contact links use the values recorded here. A practical note might say “Order boxes two days before visiting; reading room closed on Mondays.” That is your recorded guidance, not a live archive schedule.
Record a holding
- Open the repository's sources-held area and add an existing source, or choose the repository while creating a source.
- Enter the Call no. and Format for that holding.
- Save and check the source's Held at area.
A source can have multiple holdings. Removing a holding unlinks source and repository without deleting either record. Deleting the repository is owner-only; review affected holdings. It does not delete the sources themselves.
13. Research checks, duplicates, and merging
Run consistency checks
- Open Tree checker and choose Run checks when permitted.
- Wait for Scan completed. While queued/running you can continue working; the previous completed report can remain visible.
- Filter by Severity, Check, and Review status.
- Open linked records and cited sources to assess a finding.
- Correct the underlying data, Dismiss the finding, or enter Explain your decision and choose Record exception for a deliberate exception.
- Use Reopen if a dismissal/exception needs reconsideration. Run checks again after substantial corrections.
Review statuses are Open, Dismissed, and Intentional exception; severities are Error, Warning, and Information. These controls record review decisions; they do not automatically fix the data.
| Finding | What to investigate |
|---|---|
| Death before birth | Both dates, their ranges, and supporting sources |
| Lifespan above 120 | Identity and vital dates; the shortest possible lifespan is assessed |
| Baptism/christening before birth | The dates and event identity |
| Burial/cremation before death | The date interpretation and evidence |
| Union ends before it starts | Partnership facts within the recorded episode |
| Repeated partnership events | A real remarriage/episode versus duplicate facts |
| Conflicting vital facts | Competing dates, places, or claims an event occurred |
| Biological parent age below 12 or above 80 | Birth dates and relationship type |
| Duplicate family | Members and episode context, not only names |
| Empty family | Whether an empty record is intentional |
| Disconnected person | Missing links versus a deliberate separate family group |
Approximate dates allow five years either side in the checker policy. “Disconnected” means outside the largest connected family group, not necessarily an erroneous record. Possible person duplicates have a separate queue.
Review possible person duplicates
- Open the duplicate review action from Persons or Worth a look.
- Read both people, the similarity score, supporting reasons, and concerns.
- Open the full records and compare relatives and evidence.
- Choose Skip to move on if uncertain, or proceed to a merge preview when you have established they are the same person.
A score out of 100 ranks candidates; it is not a probability or proof. Use Skip to move past a pair you cannot confidently identify. Compare dates, relatives, places, and evidence before deciding whether two records describe the same person.
Merge two records — owner only
Persons, Families, Places, and Sources have pairwise merge workflows. Notes, Media, and Repositories do not offer pairwise merging.
- Export the project before making an irreversible cleanup.
- Open the record's merge action and select the other record of the same type in this project.
- Identify A, the survivor, and B, the record that will be removed. Use Swap which one survives if needed.
- Review the field-by-field values, dependent links, and counts. Select the correct value for each conflicting field.
- Check facts and evidence that will remain separately; conflicting facts can survive as two claims rather than being reconciled automatically.
- Choose Merge these two only after the preview matches your research decision.
- Inspect the surviving record, citations, family links, and media afterwards.
Warning: B is deleted and links are moved to A. A keeps its identity. This has no normal Undo and cannot be treated as a reversible deduplication suggestion. Merging persons does not decide which competing birth fact is true; retain or resolve facts using their evidence. Merge needs permission to update A and delete B, making it an owner operation under the current policies.
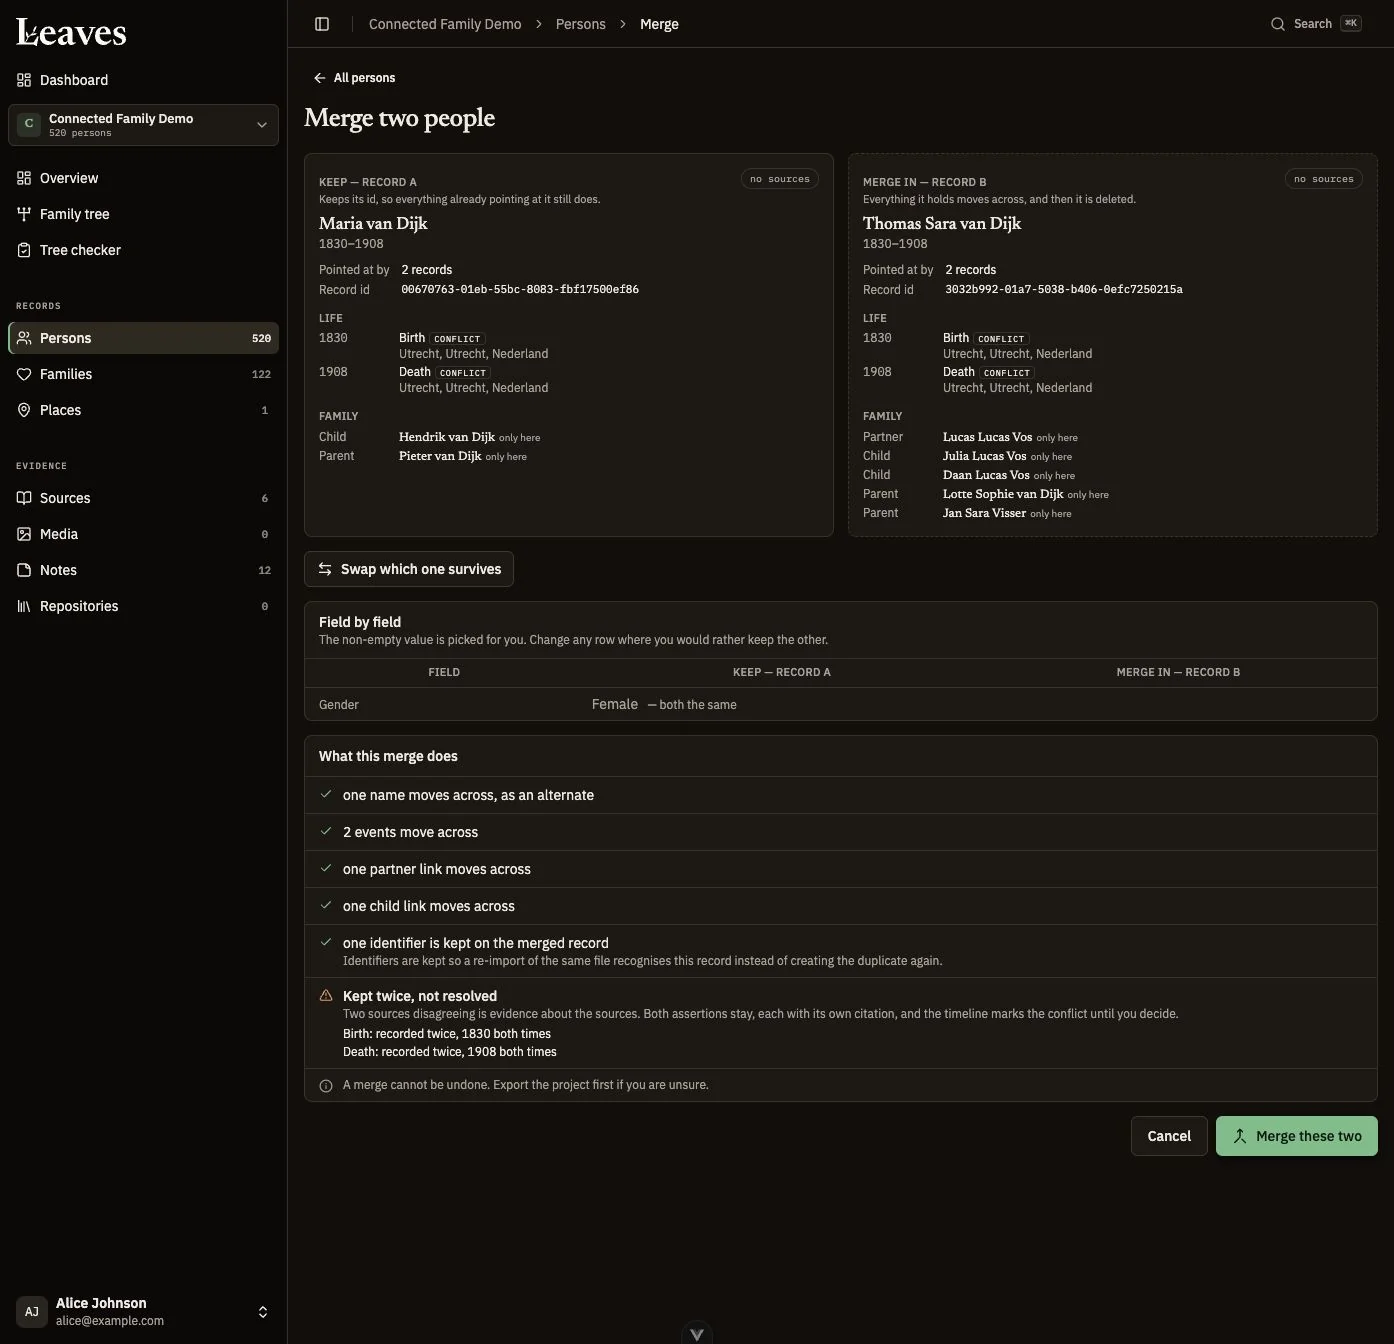
- 1A survives, B is removed; verify both identities.
- 2Field-by-field choices affect retained values.
- 3Review moved links and unresolved facts.
- 4Permanent action. Compare the records before merging.
Figure 9 — Review before merging. A and B are explicit, and field choices determine the retained record. Compare names, dates, relatives, and sources before confirming a merge.
14. Collaboration, privacy, discussions, and history
Invite a collaborator
- Open project Overview → Who has access → Invite.
- Enter Email and choose They will be able to: Viewer, Editor, or Admin.
- As owner, decide whether to enable Show details of living people. It is off by default.
- Optionally add Message (up to 2000 characters).
- Choose Send invitation and check the pending invitation list.
- After acceptance, confirm the collaborator and role in Who has access.
Free allows two Viewer collaborators per project, counting accepted and pending invitations. Editor/Admin roles require the project's owner to have Pro; Pro has no collaborator limit. You cannot invite the owner as a collaborator or create another active invitation/membership for the same email in the project. Verify your email address before sending invitations.
Pending invitations show expiry and Resend. Resending replaces the invitation route with a current email link; ask the recipient to use the newest message. Check the expiry shown for the invitation.
Change or remove access
Use a collaborator's Role for … control to choose another permitted role, where exposed. To stop access, choose Remove …, read Remove access?, and confirm Remove access. Their contributions stay in the project; revoking access does not erase authorship or records they added.
Only the owner can grant living-person access. Changing a collaborator’s role does not automatically change that permission. If you need to change who can see living-person details, ask the project owner to review the sharing settings.
Living people and explicit restrictions
The interface describes Possibly living as no death date and a birth within the last 110 years. Treat this as a heuristic. Owner access and explicitly allowed collaborator access differ. Entering a death date purely to bypass privacy is not an appropriate correction.
Access on records offers No restriction, Confidential, Locked, and Private. Explicit restrictions and living-person redaction are separate; allowing living details is not permission to see every explicitly restricted fact or evidence item. Restrictions can affect associated evidence, history, discussion anchors, checks, and exports as well as the record page.
Before sharing sensitive information: review the record’s Access setting and the collaborator’s living-person permission separately. Check what the intended collaborator can see. Do not use Locked as a substitute for checking access. If the result differs from what you expect, stop sharing that information and contact Leaves. These settings do not publish your project on the web.
Discussions
- Open Discussions on a supported fact/evidence record or use its discussion icon.
- Choose Start a discussion and enter the research question.
- Use Reply to add evidence or clarification.
- Choose Mark resolved when the question is settled, or Reopen when new evidence changes the conclusion.
- Use Open record to return to the anchor.
Readers can see discussions they are authorized to see; participation and resolution require editing access. A deleted anchor makes its discussion read-only, and access can be further restricted. A resolved discussion is not a replacement for updating the fact and citation. Return to Discussions to follow the conversation.
History and concurrent work
Change history and media History help identify recorded changes, actors, and times. This is a review log, not a general “restore any previous version” interface. Presence indicators such as “... is editing this record” warn you that another person is working nearby; they are not exclusive record locks.
A live notice, This project changed elsewhere. Refreshing the latest data., signals changes from another session. If edits conflict, use the conflict procedure to compare your draft with current server values rather than assuming your last screen is authoritative.
15. Import, export, deletion, and recovery
Bring research in
The wizard advertises GEDCOM 5.5.1, GEDCOM 7, GEDCOM X, and GEDZIP. File choices are
.ged, .gedzip, .zip, .json, and
.xml; JSON/XML must be the supported genealogy structure, not arbitrary data. A
GEDZIP/ZIP genealogy archive must include a readable .ged file; an archive of images
alone is not a genealogy import.
- Choose Import GEDCOM from the project/dashboard entry available to you.
- At Step 1 of 3, Bring your research in, choose or drop the export file.
- Under Where it goes, choose A new project or A project I already have. For an existing project choose Which project; for a new project review Project name.
- Choose Continue. Inspect What the file holds before anything is committed.
- Review damaged-character, collision, and relationship-mapping warnings. Use Back to replace a wrong file.
- Choose Import this file only when the target and contents are correct.
- Follow Reading … and the phases. The import continues if the tab closes; reopen its project/import page later.
- Read the completed report before substantial editing. Choose Open the project and inspect several known people, relationships, notes, sources, and dates.
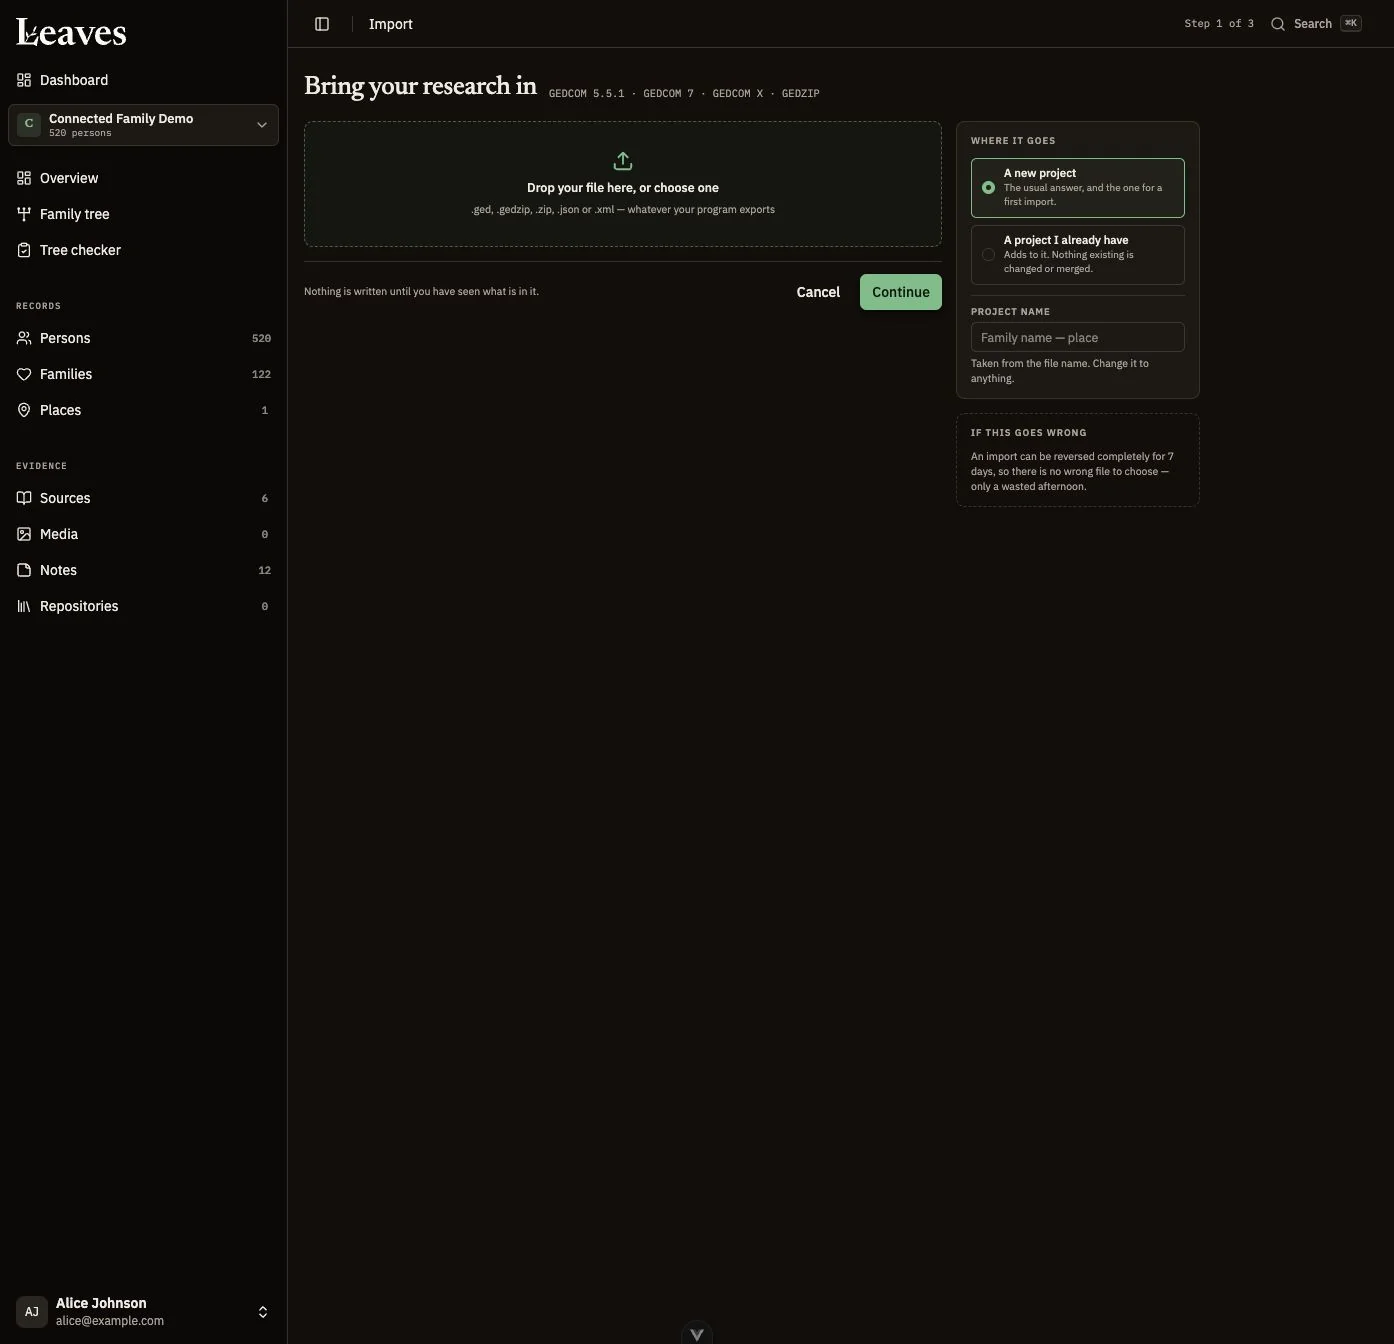
- 1Choose the genealogy file.
- 2Choose a new or existing target project.
- 3Review Project name.
- 4Continue opens preview before import.
Figure 10 — Import target. File selection, target project, and project name are separate decisions. Preview comes before the final Import this file action.
Import behavior and report
This project was not imported means the project was created in Leaves and has no import report; use Open the project to return.
An import into an existing project adds records; it does not update or automatically merge matching people. Reimporting the same tree can create duplicates even when the imported identifiers match. Use it for an intentional addition, not as a synchronization mechanism.
Preview counts describe the file. Places can be created from event text, so they are not counted
like independent GEDCOM persons/sources. Replacement characters � mean letters were
already damaged; Leaves cannot infer the original spelling. Re-export as UTF-8 from the source
program when possible.
The report distinguishes added/merged/skipped counts, Media references, source file/program/encoding, and preserved custom tags. Review its three main areas:
- Missing media: the reference/path can survive even if the file was not in the archive. Check actual bytes through Media.
- Possible duplicate places: use Consolidate, making your own location decisions.
- Dates kept as text: use Review and correct a date only when evidence supports its interpretation. The review shows up to 100 text-only dates at a time; return after corrections for the next set.
Skipped malformed lines and preserved extension data are different outcomes. Custom genealogy tags are retained on records and written back where supported, but this is not a promise of a byte-for-byte copy or perfect semantic round trip in every external program. Read Relationship meaning needs review and export mapping warnings carefully, particularly for adoption and non-biological relationships.
If Continue rejects a GEDCOM X JSON/XML file, export your research as UTF-8 GEDCOM 7 or 5.5.1 and try that file. Keep the original export and include the exact error message when asking Leaves for help.
Genealogy imports use a different upload path from Media; do not assume the Media 50 MB limit applies to a genealogy file. If an import is rejected for its size, keep the original file and contact Leaves for help.
Undo an import — owner only
- Open View import summary on the project.
- Check whether Undo this import is available and read the remaining period/refusal reason.
- Export any work you need before confirming.
- Choose Undo this import, review Undo this import?, and choose Undo the import.
You have seven days and imported records must not have been edited since. For a first import into a new project, undo deletes the imported project. For an additive import, it removes records introduced by that run while preserving what existed before it. The import report's actual refusal is decisive: expired, edited, already undone, or not finished can prevent reversal. This is not arbitrary version rollback.
A failed import reports that partial records were discarded. Use Retry import or choose the file again after resolving its cause; check the project before retrying if the result is uncertain.
Export a project
- Open Overview and choose Export GEDCOM.
- Read any relationship mapping warnings. The status says We’ll email you when your GEDCOM export is ready.
- Open the ready email and download while signed in to the authorized account.
- Save the file securely and, when moving to another program, inspect the imported result there.
The current exporter writes GEDCOM 7.0; no 5.5.1 export selector was found.
Project export is a .ged file containing genealogy data and media references, not a
bundled download of every original media file. For originals use media downloads or the
owner's account export.
Owners can export; collaborators need Let collaborators export GEDCOM. Their export is constrained by visibility. Export authorization/privacy is checked again, so access changes can invalidate a previously built link. Download links last seven days; request another export when expired.
Export your account
- Open Profile → Your data → Export everything.
- Let the download build and retain the resulting ZIP securely.
- Check its README, profile data, genealogy files, and original media before deleting anything.
This export covers projects you own, with GEDCOM 7 data and media plus account profile information. Shared projects owned by someone else are not automatically included. Large exports can take time; the current request is allowed up to ten minutes, but actual service/network limits can intervene. The export contains your research and media; it does not restore your account history, discussions, or settings. There is no one-click account ZIP restore wizard.
Create, edit, remove, or recover: choose the right action
| Intention | Appropriate action | Consequence/recovery |
|---|---|---|
| Fix a date/name/citation | Edit that item | Check save status; history is not an automatic rollback |
| Stop linking a person to a family | Remove the membership | Person remains |
| Remove one source citation | Remove citation | Source and its other citations remain |
| Remove a note from one record | Remove the attachment | Shared note remains elsewhere |
| Stop using a photo as portrait | Remove as portrait | File and depiction remain |
| Combine confirmed duplicate records | Merge | Loser removed permanently; no normal Undo |
| Reverse a recent untouched import | Undo this import | Limited seven-day/unedited eligibility |
| Delete an entire record or file | Owner delete with impact review | No general trash; person/family/place/source/repository/note detail deletion has brief immediate Undo; media does not |
| Delete a project | Owner Delete project | All project data removed permanently |
| Delete your account | Profile Delete everything | Owned data/account removed; export and transfer first |
Person, family, place, source, repository, and note detail deletion currently delays the delete request for seven seconds while Undo is available. This cancels the pending delete; it is not restoring data from a trash after permanent removal. Media, merges, project deletion, and account deletion do not share that recovery promise. A delete dialog's impact is more specific than a generic warning. Read it for dependencies and shared uses. Do not interpret brief Undo on a particular action as a recovery guarantee for other actions. Leaves backups are not a documented self-service recovery mechanism.
16. Complete research workflows
A. Build a small family from scratch
- Create a project named for the branch/place you are studying.
- In Persons, create Catherine Brown with the name information you know.
- Add a Birth fact: use about and a year if you only know an approximate age; select/create the correct Chicago place.
- Create Robert Smith after searching for an existing record.
- Use Add relationship → Partner, select Robert, and create/select their household.
- Add the marriage fact to the family, preserving the known date precision and place.
- Add James as a child; choose per-parent types from evidence rather than assuming biological.
- Create the source for the register/census, upload its scan, and use Evidence for to connect the scan.
- Cite the source on each relevant fact with the page/entry and quotation.
- Write a note explaining remaining uncertainty, attach it to the people/source, and wait for saved status.
- Set a Focus person, explore the tree, and review Tree checker findings before sharing.
Expected result: a connected family whose claims can be traced to evidence, with unknowns left visible rather than disguised by exact dates.
B. Move an existing tree to Leaves
- Export genealogy from your previous program as a supported format, preferably UTF-8 GEDCOM; include media in an appropriate GEDZIP archive when available.
- Import to A new project and verify the preview's approximate record counts.
- Read encoding and relationship warnings before confirming.
- After completion inspect familiar families, including adopted/foster relationships and uncertain dates.
- Review missing files, text-only dates, and duplicate places in the report.
- Decide within the undo period whether to keep the import before editing imported records extensively.
- Consolidate only confirmed duplicates, attach actual media, and repair citations where needed.
- Export GEDCOM and inspect it in the receiving genealogy program if portable fidelity matters.
Expected result: imported research with a reviewed report. Repeating the import is an additive operation, not an update of the existing tree.
C. Work through a register page
- Create/select a source for the register, with its author and repository/call number.
- Upload the page as Document scan and link Evidence for that source.
- Search existing persons; create only missing identities.
- Enter facts using the page's dates and places, keeping an ambiguous spelling in a note.
- Use Link people and facts to cite the page on the specific people/names/facts, including roles and quotes.
- Attach a shared note with your transcription and reasoning if the native source transcription editor is unavailable.
- Open the source's Citations to confirm every intended link.
Expected result: one scan/source with multiple precise citations, not several disconnected copies of the page.
D. Research with a relative
- Agree whether the relative should read, edit, or invite others.
- Owner checks Pro/Free collaborator allowances and sends the appropriate invitation.
- Decide living-person visibility separately and verify it using the recipient's account before storing sensitive material.
- Relative accepts using the invited email, switches into the project, and searches for the record.
- Use Discussions to ask about a disputed fact; preserve competing evidence in notes/citations.
- Observe presence and save/conflict messages when working on the same record.
- Record the conclusion in the fact/citation and mark the discussion resolved.
- Owner reviews Who has access and removes access if the collaboration ends; contributed research stays.
Expected result: controlled collaboration with visible reasoning. Ask the owner to perform any step unavailable to your role.
E. Prepare a tree for sharing or departure
- Review documentation gaps in Overview and run Tree checker.
- Resolve findings with evidence; record intentional exceptions rather than falsifying the data.
- Compare duplicate suggestions and merge only established duplicates after an export.
- Review living-person and explicit restrictions with the intended recipient role.
- Invite a Viewer, or enable collaborator export only when intended.
- Download your project/account exports and original files you need.
- Before leaving an owned project, transfer it to an accepted collaborator with sufficient capacity.
- Delete your account only after reviewing what will be permanently removed.
Expected result: a reviewed collection, intentional sharing, and retained portable data before any irreversible account action.
17. Profile, preferences, and security
Profile and photo
Open the account menu → Profile. The name field saves through its inline behavior. Upload photo accepts JPEG, PNG, or WebP up to 5 MB; The photo must be between 100 and 4000 pixels per side. Use Remove to remove the account photo. This photo is separate from a genealogical person's portrait.
Change email
- Edit Email in Profile and submit through its save behavior.
- Confirm the new address through the message sent there.
- Until confirmation, keep using the old address for sign-in. Use Resend email or Cancel in the pending state if necessary.
- Review the confirmation outcome before assuming the change completed.
Confirmation does not happen just by typing a new address. A confirmed change can provide a time-limited Undo link; the Undo window is 72 hours. Undo reverts the email and revokes sessions. Check the expiry shown in the email.
Change password
- In Profile enter Current password, New password, and the confirmation.
- Use at least eight characters and choose Update password.
- Confirm success and sign in again on other devices if needed.
The normal password-change workflow retains the current session and signs other devices out. A password reset revokes existing sessions more broadly.
Manage sessions
Review Profile's session list and This device marker. Sign out a specific other session, or choose Sign out everywhere else. A revoked device must sign in again; the action does not erase its downloaded copies of research. Session labels depend on available browser/device information, so use both age and device description when investigating an unfamiliar session.
Settings
Every choice in Settings saves itself:
| Preference | Available options/meaning |
|---|---|
| Theme | Light, Dark, System |
| Density | Compact, Comfortable; changes list spacing |
| Language | English, Nederlands, Deutsch, Français (France), Español (España), Español (Latinoamérica), Italiano (Italia), Polski (Polska), Português (Portugal), Português (Brasil), 简体中文(中国大陆), 日本語(日本), 한국어 (대한민국), हिन्दी (भारत), Bahasa Indonesia (Indonesia), Русский (Россия), العربية |
| Names shown as | Given Surname or Surname, Given |
| Dates | Spelled month, locale numeric, or ISO 8601; the examples reflect locale |
Preference changes affect your display, not other researchers' stored genealogy. Names shown as does not rewrite name parts; date display does not add precision. An unsuccessful server save can leave a local preference applied but not synchronized to another device; check the status/error and retry with a connection.
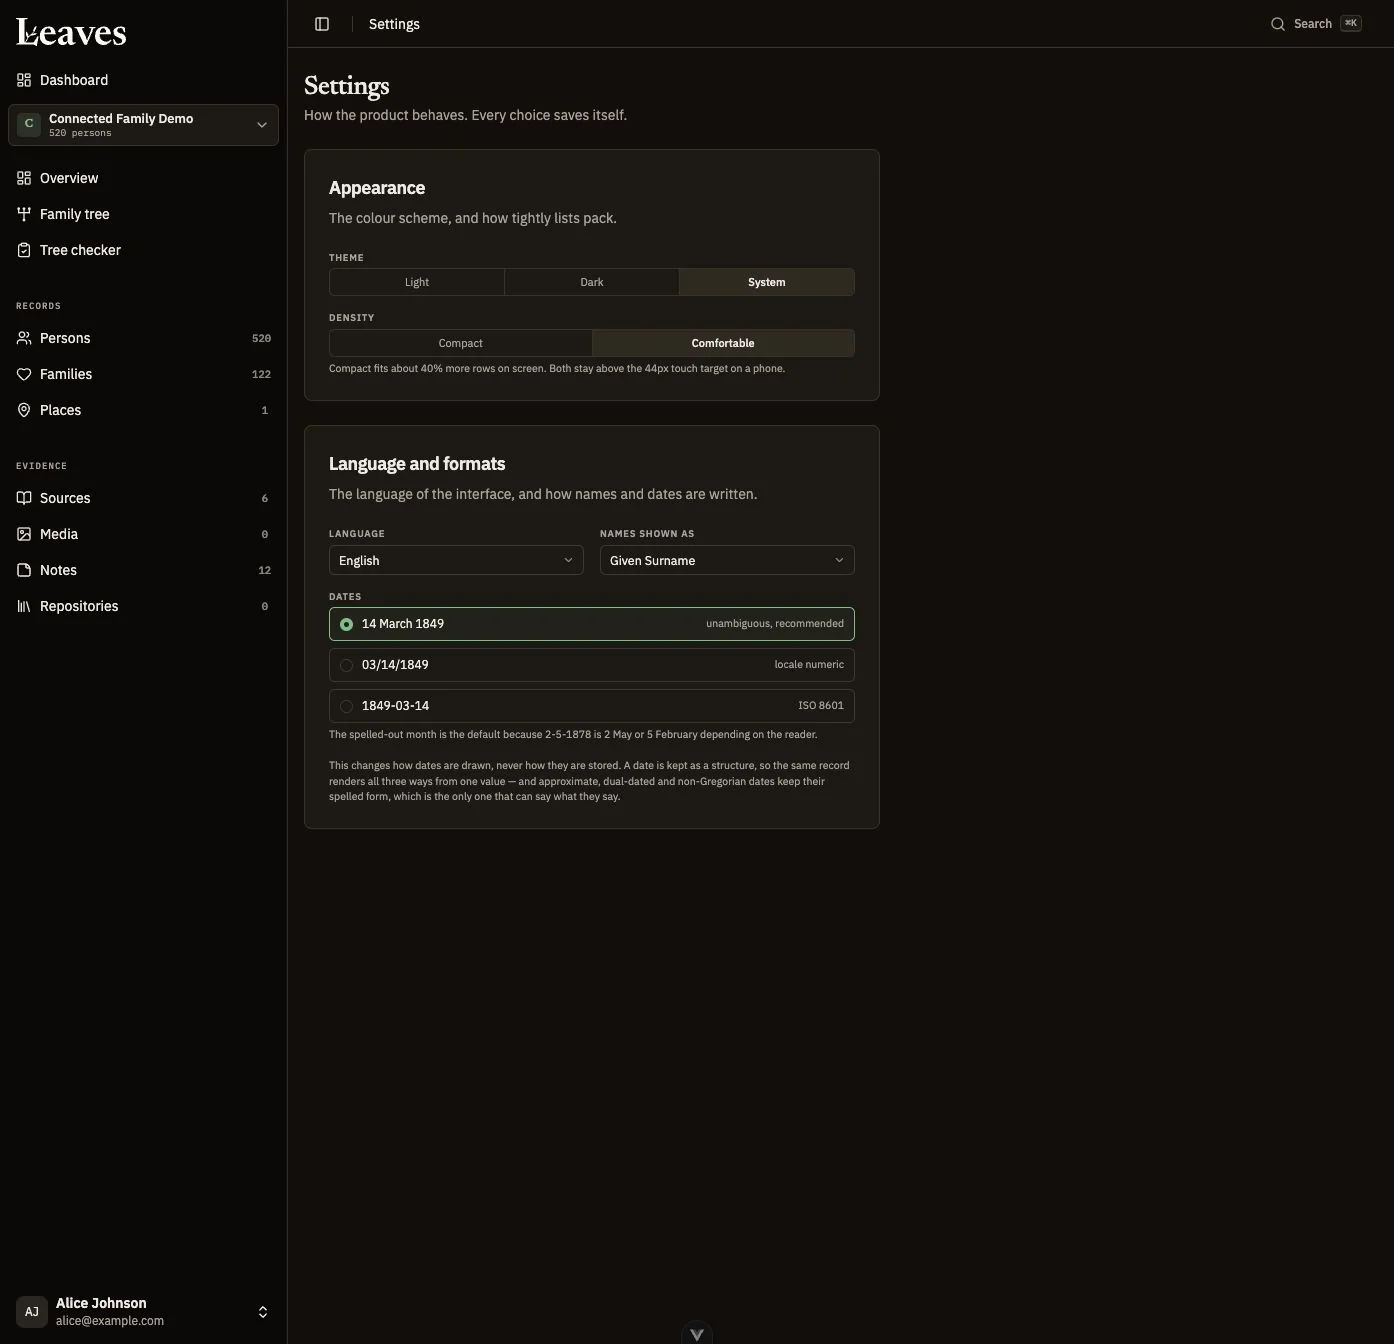
- 1Theme and density affect your display.
- 2Language, name order, and date formats save themselves.
Figure 11 — Personal settings. Appearance and formatting are personal; there is no Save button because choices save themselves. Project privacy is managed in the project, not here.
Delete your account
- Open Profile → Your data and choose Export everything first.
- Transfer owned projects that someone else must keep through Project settings.
- Read Delete everything and its affected projects/collaborators.
- Enter your password and confirm Delete account only when ready.
Warning: self-service account deletion permanently removes the account and owned project data. Other collaborators lose those owned projects unless transferred first. Your membership in projects owned by others is removed rather than deleting those projects. There is no cooling-off period for this action.
18. Plans and billing
Open the account menu → Billing. The page is titled Billing & plans, with Your plan, Choose a plan, and Usage. This describes your account's capacity; ownership determines which account's limits a project uses.
| Plan | Plan allowance |
|---|---|
| Free | 1 owned project, unlimited records, 250 MB media storage, 2 Viewer collaborators per project |
| Pro | Unlimited owned projects, unlimited records and collaborators, 5 GB media storage, Editor/Admin collaborators |
| Extra storage | A 25 GB pack offered alongside Pro billing |
Storage display and plan labels use different byte conventions, so the usage meter may show a different number from the plan’s headline allowance. Use the actual usage meter and reported capacity when planning uploads. Exceeding a limit does not automatically delete your research. Additional creation/upload/import can be blocked, and downgrade restrictions can make some projects read-only.
Subscribe or add storage
- Choose Monthly or Yearly under Billing cycle.
- Select Pro and optionally Include extra storage.
- Review the displayed recurring total, tax wording, and frequency.
- Choose Add subscription to proceed to the secure payment provider.
- Complete checkout yourself, then return to Billing and check Your plan and capacity.
Review the current price, billing frequency, storage allowance, and recurring total before starting checkout. Use the amount shown in Billing & plans and at checkout when deciding whether to subscribe.
Manage or end a subscription
- Open Billing on the paid account and choose Change plan (or Manage billing where offered) for the provider portal. Review payment methods, invoices, plan changes, effective dates, and recurring charges there. Follow the portal’s instructions and check the effective date before confirming a change.
- To end Pro from Leaves, choose Cancel plan, then read Cancel Pro plan?.
- If prompted, select Keep this project writable on Free.
- Choose Schedule cancellation and verify Cancels on … rather than assuming immediate termination.
- Under Storage packs, use Buy storage pack to prepare an additional purchase or Cancel pack to open Cancel storage pack?; confirm Cancel pack only for the intended pack. Check its ending date.
Storage-pack management is separate from cancelling Pro.
When scheduling a Pro downgrade with more than one owned project, select the project that will remain writable under Free. Cancellation takes effect at the indicated period end; additional owned projects remain available for viewing rather than being erased. The Free role/allowance restrictions also apply after downgrade; check access and export while preparing the change. A storage pack remains effective until its shown ending date, after which uploads may be blocked if usage exceeds capacity.
If a payment fails or the subscription is past due, update the payment method in the billing portal, then refresh Billing. If your receipt and Leaves account capacity still disagree, contact Leaves with the payment date and the displayed status.
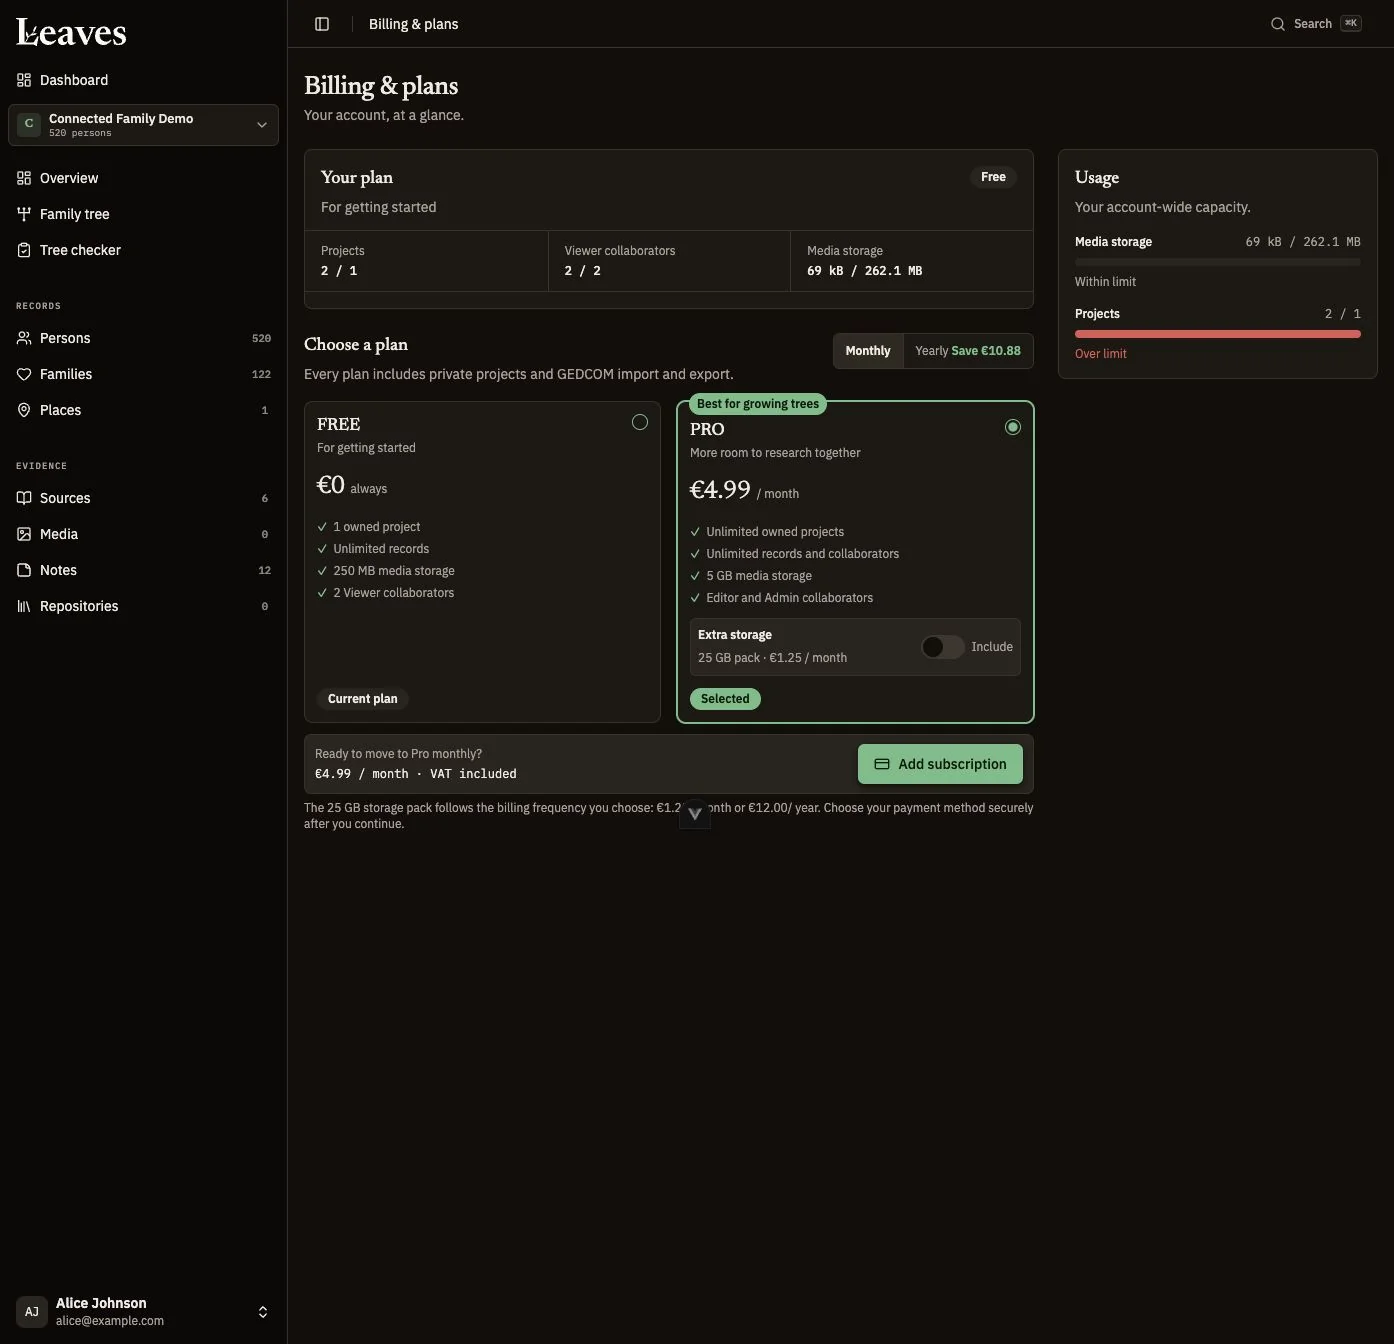
- 1Your plan reflects current account capacity.
- 2Choose frequency and review the subscription quote.
- 3Usage shows limits and any over-limit state.
Figure 12 — Billing & plans. Your plan and Usage show your account capacity. The plan cards and Billing cycle help you review a subscription quote.
19. Integrations and notifications
| Connection | Everyday use | Configuration and limitations |
|---|---|---|
| Genealogy formats | Import/export research with other programs | Import and export files when you want to transfer research |
| OpenStreetMap/Photon lookup | Address suggestions and maps | Choose and review location matches; no personal API key is needed |
| Verification, email-change confirmation, password reset, invitations, ready project exports, supported billing notices | Check your email address, spam folder, expiry, and newest link | |
| Stripe | Subscription/extra-storage checkout and billing management | Use secure checkout and the billing portal to manage payments |
| Live project updates/presence | Notice other edits and refresh data | Updates connect automatically while you are signed in |
Leaves shows save confirmations, error messages, upload progress, Undo where supported, and conflict notices in the application. Check these messages before leaving a page, especially after editing or uploading.
Some supported edits can queue locally during a connection failure. This is limited offline synchronization, not a promise of full offline operation. Creation, uploads, imports, deletion, and every edit type are not covered uniformly. Queued work is tied to the local browser/account; signing out can clear local queued state. Preserve unsaved text, reconnect, and check the saved record before switching devices or clearing browser data.
20. Troubleshooting and help
Saving conflicts
If This record changed appears:
- Keep a copy of important draft text.
- Compare Your change with the Current server value for each conflicting field.
- Choose Use server value, Continue editing, or Keep my change deliberately.
- Review the combined draft and choose Save merged record when offered.
- Reopen the record and verify that the intended changes were saved.
Presence indicators reduce surprises but do not prevent concurrent edits. Do not keep clicking Save without comparing evidence.
Common problems
| Symptom | Likely causes | Recovery |
|---|---|---|
| A known record is missing | Wrong project, active search/filter, privacy, deleted record | Check Switch project; clear filters; ask the owner to inspect role/privacy/history |
| Access denied | Wrong account/role, private route | Sign in to the intended account; ask project owner or Leaves for legitimate access |
| Page not found | Old URL, moved/deleted record | Use Dashboard and search; ask owner whether the record was merged/deleted |
| You have view-only access to this project | Viewer role or plan restrictions | Ask owner for the appropriate permitted role/retained project; upgrading your own account may not change a shared project's owner allowance |
| This project is still importing | Server import not finished | Follow progress and wait; reopen later rather than creating duplicate edits |
| Sign-in paused | Failed attempts reached throttle | Wait for displayed countdown; use password recovery if needed |
| No reset/verification/invitation email | Typo, spam, cooldown, delivery failure | Check address and spam, resend after cooldown; contact Leaves if messages still do not arrive |
| Wrong-account invitation/verification | Browser holds another account | Use the page's sign-out/reopen route and intended email |
| Expired/incomplete link | Old, clipped, used, or malformed URL | Request a fresh link and open the complete newest email link |
| Not saved — your text is still here | Connection or service problem | Copy draft, keep page open, reconnect and Retry; check the saved record |
| Preferences differ on another device | Local choice was not synchronized | Reconnect, retry settings save, refresh the second device after confirmation |
| Upload rejected | Over quota, over 50 MB, unsupported detected type, failed conversion | Check Usage, reduce/convert file deliberately, retry only failed items |
| Imported media will not open | Reference exists but original bytes missing | Check archive/folder, upload actual files, verify attachments; request help with reconnect matching |
| Map has no pin | No valid coordinates or unmatched location | Edit/locate the place, review candidate geography, keep textual place if uncertain |
| Location search unavailable | Gazetteer/network/Leaves issue | Use existing places or manual entry; report lookup failure |
| Import will not preview | Wrong structure/archive, broken export, incompatible export, upload limit |
Re-export supported UTF-8 GEDCOM, ensure archive has a .ged, ask Leaves about
format/size
|
| Import fails partway | Malformed data or import processing problem | Read report; partial imported rows should be discarded; resolve cause and Retry import |
| Undo import unavailable | Over seven days, edits since import, unfinished/already undone | Read refusal; retain export, correct specific records; do not expect a general rollback |
| Duplicate score looks wrong | Heuristic resemblance, incomplete data | Compare original sources and relatives; Skip uncertain candidates |
| Family badge differs from editor | Imported legacy relationship representation | Do not save blindly; compare parent-specific types and seek project owner or Leaves review |
| Privacy/Locked label behaves unexpectedly | Access settings or collaborator permissions need review | Stop relying on the label; have project owner or Leaves verify with intended role before sharing sensitive details |
| Export email delayed or download fails | Queue/mail issue, expiry, revoked access, changed privacy | Check email/role; request fresh export; ask Leaves about export job |
| Billing capacity disagrees with payment | Delayed provider synchronization/manual entitlement | Refresh Billing, inspect provider receipt/portal, ask Leaves to reconcile |
| Tree branch absent | Bounded generations, different focus, missing link/privacy | Adjust Generations/focus and inspect family links; Fit all affects only loaded tree |
Where to get help
For a research question or project access, start with the project owner. Use Discussions to keep questions about evidence beside the relevant record. For account, email, import, or billing problems, contact Leaves through the channel used for your beta invitation.
When asking for help, include the page or record type, time, exact error text, your project role, browser, and steps to reproduce. Remove sensitive details from screenshots. Never send passwords or email-link tokens. Keep your original genealogy export and media files while investigating import problems.
21. FAQ
Does a person need a full name and birth date? No. You can begin with partial identifying information and fill it in later. Unknown dates are better than invented exact ones.
Is a source the same thing as an uploaded scan? No. The source describes the evidence; Media holds the file; a citation links the source to a claim.
Why is the tree not showing all people? It loads a bounded neighborhood around the focus. Check Generations and actual family links.
Can I represent adoption or uncertain parentage? Yes, parent-child types and membership status are explicit. Verify imported legacy summaries against the current per-parent editor before saving.
Does reimporting update my old tree? No. Imports are additive and can introduce duplicates. Preview collisions and merge only after review.
Can I undo any mistake through Change history? Change history does not provide a general restore. Import undo has a limited eligibility window, and particular actions may offer brief Undo. Merges and project/account deletions are permanent.
Can a Viewer download genealogy? Only if the owner enables collaborator GEDCOM export. Privacy rules still constrain what the Viewer receives.
Can an Editor delete a person or merge duplicates? Not under the current whole-record deletion policies. Ask the owner. Some editing controls are available only to the owner.
Does Public on a media file publish it on the internet? No. It is an access label within your private project. Check the recipient’s access before sharing sensitive media.
Does Pro give every shared project more capacity? A project's owner's allowance matters. Your personal plan does not replace another owner's storage/project limits.
Will cancelling Pro erase research? No automatic erasure was found. Free limits and read-only restrictions can apply; select the retained writable project and prepare exports.
Does Export GEDCOM include original scans? The project .ged export
includes references, not every file's bytes. Download originals or use the owner's account
export.
Can I edit the source transcription directly? Use a clearly labeled Note attached to the source to record your transcription.
Can I work completely offline? No. Some edits can wait locally during a connection failure, but creating records, uploading files, and importing research need a connection. Keep a copy of important drafts, reconnect, and check that your changes saved before signing out or switching devices.
22. Glossary, shortcuts, and limits
Glossary
| Term | Meaning |
|---|---|
| Anchor | The record or fact a discussion belongs to |
| Citation | A specific evidence link, potentially including page, role, confidence, and quote |
| Confidence | Your assessment of a fact or supporting citation, not an automated proof |
| Depicts | A media link identifying a represented record/subject |
| Evidence for | A media link to the source that the scan represents |
| Focus person / person of interest | Starting point for the project's relationship view |
| GEDCOM | A genealogy interchange format; the current project exporter writes 7.0 |
| GEDZIP | An archive containing genealogy data and potentially media |
| GEDCOM X | A structured genealogy format advertised for JSON/XML import |
| Geocoded | A place has coordinates usable on a map |
| Holding / call number | A source's repository association and retrieval identifier |
| Household / Family | Structural group of partners and children, independent of a particular marriage claim |
| Imported identifier / XREF | Identifier carried from genealogy import; not proof two records are the same person |
| Living-person visibility | An additional collaborator permission for possibly living records |
| Merge survivor | Record A that retains its identity while record B is removed |
| Possibly living | Privacy heuristic based on recorded birth/death information |
| Restriction | Record-specific access metadata, distinct from project membership |
| Stub | A minimal new person/record created from a picker, to enrich later |
| Transcription | Text copied from source material, separate from interpretation |
Keyboard shortcuts
Use ⌘ on macOS and Ctrl elsewhere where the application uses the platform modifier. Shortcuts are contextual and usually do not run while typing in a normal field.
| Shortcut | Where it works |
|---|---|
| ⌘/Ctrl + K | Global Search/command palette |
| / | Focus screen search where registered |
| j / k | Move focused row in supported lists |
| Enter | Open/activate the focused row or save a supported inline edit |
| x | Toggle selection for a focused selectable row |
| ⌘/Ctrl + N | New person on Persons; not a universal new-record shortcut |
| ⌘/Ctrl + T | Open family tree, using the focused person where supported; can take precedence over the browser's new-tab shortcut |
| ⌘/Ctrl + S | Save an active editor that registers it |
| ⌘/Ctrl + Enter | Save and add another in forms offering that action, such as new person |
| Escape | Close/cancel/revert a supported editor; a dirty form may ask about unsaved changes |
| Arrow keys / 0 | Pan / fit in the media image viewer |
Use the visible edit and delete controls for the current page. Keyboard shortcuts are contextual; they do not provide a general undo for deleted records or merged data.
Fact-type menu reference
The Type menu offers the following 100 labels. Their availability does not create structural family links or imply that each is relevant to every record. Other event is the fallback for a custom imported event; use a note to explain a custom event in your own words.
Adoption, Adult Christening, Amnesty, Ancestral Hall, Ancestral Poem, Apprenticeship, Arrest, Award, Baptism, Bar Mitzvah, Bat Mitzvah, Birth, Birth Notice, Blessing, Branch, Burial, Caste, Census, Christening, Circumcision, Clan, Confirmation, Court, Cremation, Death, Education, Education Enrollment, Emigration, Enslavement, Ethnicity, Excommunication, First Communion, Funeral, Gender Change, Generation Number, Graduation, Heimat, Immigration, Imprisonment, Inquest, Land Transaction, Language, Living, Marital Status, Medical, Military Award, Military Discharge, Military Draft Registration, Military Induction, Military Service, Mission, Move From, Move To, Multiple Birth, National Identifier, Nationality, Naturalization, Number of Children, Number of Marriages, Obituary, Official Position, Occupation, Ordination, Pardon, Physical Description, Probate, Property, Race, Religion, Residence, Retirement, Stillbirth, Tax Assessment, Tribe, Visit, Will, Yahrzeit, Annulment, Civil Union, Common Law Marriage, Divorce, Divorce Filing, Domestic Partnership, Engagement, Marriage, Marriage Banns, Marriage Contract, Marriage License, Marriage Notice, Separation, Adoptive Parent, Biological Parent, Child Order, Entering Heir, Exiting Heir, Foster Parent, Guardian Parent, Sociological Parent, Step Parent, Surrogate Parent.
Limits and validation reference
| Item | Rule or limit |
|---|---|
| Account password | At least 8 characters, confirmation required for creation/change/reset |
| Project name | Up to 255 characters |
| New person | At least a name, gender, or birth information |
| New family | At least one partner/person |
| New fact | Type required; date/place can be unknown |
| New source | Title required |
| New repository | Name required |
| New note | Subject or body required; creation language code up to 20 characters |
| Place | At least one address component; coordinate ranges −90…90/−180…180; country code 2 letters |
| Media | Advertised 50 MB/file; detected MIME type must be supported; owner storage quota also applies |
| Profile photo | JPEG/PNG/WebP, up to 5 MB, 100–4000 pixels per side |
| Citation linking batch | Up to 100 targets; role-as-written up to 255 characters |
| Project invite message | Up to 2000 characters |
| Tree display | Ancestors 0–8; descendants 0–6; effective sibling depth bounded by ancestor depth |
| Date entry | Years 1–99999; valid calendar day/month; time 00:00–23:59 |
| Text-date import review | Up to 100 remaining date records at a time |
| Import Undo | 7 days, no subsequent edits to imported records, owner only |
| Project-export link | 7 days; current authorization/visibility still checked |
| Password reset | 60-minute link, 3 requests/15 minutes |
| Sign-in throttle | 5 failed attempts, 5-minute pause |
| Confirmed email-change Undo | 72 hours |
Use the countdown, error message, usage meter, and impact confirmation shown for the current action. They tell you whether you can continue, need to wait, or have reached a limit.