

1. Connect the document to a particular claim
A source is the item you consulted: a register, certificate, photograph or interview. A citation identifies the entry and connects it to something you say about a person. The claim might be a death date, an occupation or a relationship. Give each important claim its own evidence link so another researcher can see why you recorded it.
The examples below come from historical records and research notes in the Verschoor project, used with the project owner's permission. Cornelis Verschoor died in 1826. The screenshots show the production Leaves interface and its historical records. The archive readings below come from the project's research notes; the originals have not been independently re-read for this guide. Archive links and entry references are included so you can check the evidence yourself.
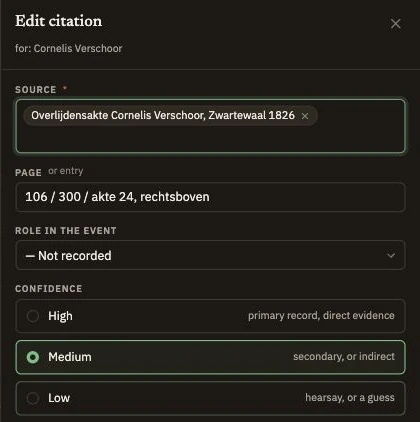
2. Write a reference you can find again
Record who created the item, what it is called, where it is held and which part you used. For a civil register, keep the municipality, record type, year and entry number. Add collection and volume references where available. For an online record, retain its stable link and the date you consulted that representation. A scan number can help, but the register's own entry number remains useful when a viewer changes.
For this case, the project records the civil registrar as creator, a Zwartewaal death record from 1826, and the locator 106 / 300 / entry 24, upper right. Its recorded reading gives Cornelis's death as 15 November 1826, at six in the morning. A compact working reference is:
Civil registrar, Zwartewaal, death register 1826, entry 24, Cornelis Verschoor; Streekarchief Voorne-Putten, collection 106, volume 300, upper right; linked archive record.
This reference uses the repository and locator saved in the project. When you consult the archive item, add your actual consultation date. Do not invent a scan inspection date, or say you read the handwriting if you used only an index or someone else's transcription.
3. Separate the reading from your reasoning
A transcription copies the source's words; a translation renders those words in another language; a summary condenses them. Label which you have made. Mark unreadable passages instead of filling them from expectation. Keep your interpretation in a separate research note, where it can change without changing what the document was reported to say.
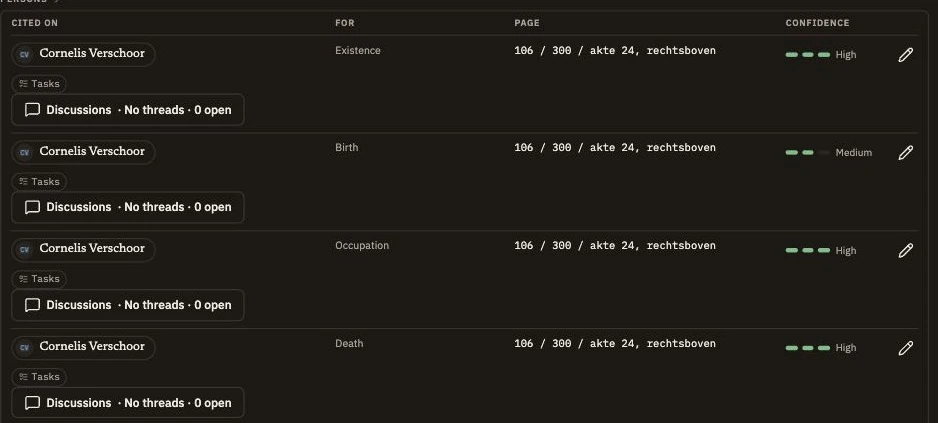
The project's summary reports Cornelis as 72 at death. That age supports an estimated birth year around 1754, but the death entry is not a birth record. The calculation and its limitations belong beside the birth claim. See recording uncertain dates for the birthday interval and why an exact-looking subtraction can mislead.
4. Record what you actually inspected
An archive index is a useful finding aid. A transcription can make difficult handwriting searchable. An image lets you check the page, margins and surrounding entries yourself. Each representation can introduce or preserve mistakes. Record which one you consulted, whether the whole entry was visible, and which passages remained uncertain.
Inspection and confidence answer different questions. Seeing an original image describes your access to the evidence; it does not establish that you identified the right person or read every word correctly. Likewise, an original death entry can contain an inaccurate birth age. Assess the information that supports the particular claim, including who could have known it and when.
5. Keep the source and citations together in Leaves
- Create or select the source under Sources, using a descriptive title.
- Open the relevant fact's citation control and choose that source.
- Put the entry locator in Page; it can hold an entry or volume reference.
- Use What the source says for source wording, clearly labeling any translation or summary.
- Choose Confidence after assessing this claim, or leave it Not judged.
- Add a linked research note for interpretation, inspection limitations and the next check.
Leaves can retain separate inspection metadata through permitted integrations. The current citation form has no dedicated inspection controls, so record that context in a labeled note when working manually. The sources manual explains the controls, and the source citations page shows how one source can support several facts. Attach a scan as Evidence for the source if you have one.
6. Check the citation before moving on
- Can someone find the exact entry from the reference and link?
- Does the citation support this fact, name or relationship?
- Have you identified the representation you actually consulted?
- Are quotation, translation, summary and interpretation clearly distinguished?
- Have you preserved any uncertainty or conflicting evidence?
A useful citation lets you return to the evidence and reconsider it. You can improve its formatting later; keeping the entry reference and your reading now prevents a harder search later.